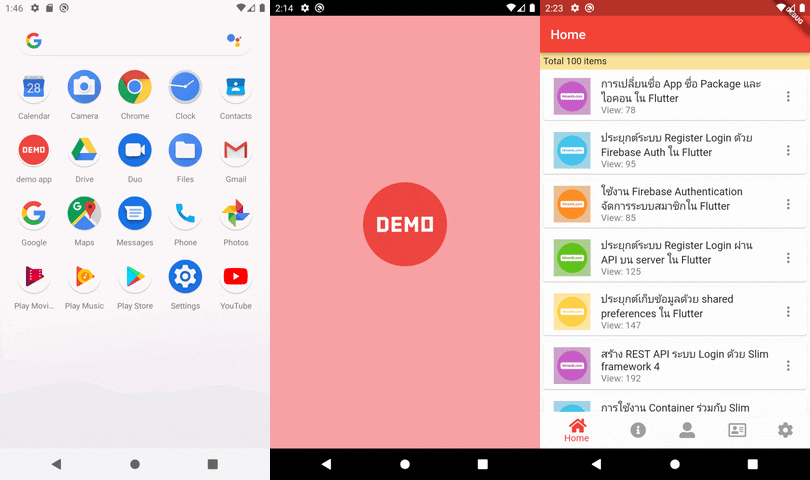
Splash screen หรือที่รู้จักใช้ชื่อ Launch screens เป็น
ส่วนที่ทำงานเริ่มต้นในขณะที่ app กำลังโหลดข้อมูลและ
ตั้งค่าเบื้องต้นต่างๆ ในที่นี้จะพูดถึงเฉพาะส่วนของ android
Launch screen ใน Android
ก่อนหน้านี้ใน flutter จะมีส่วนของการควบคุมหน้า screen ก่อนเริ่ม app ในสองส่วนคือ
launch screen แสดงในขณะที่ระบบ android ของ app กำลังเตรียมพร้อมทำงาน แล้วตามด้วย
หน้า splash screen ในขณะที่ flutter กำลังจะเตรียมพร้อมทำงาน ตามลำดับ
ใน Flutter 2.5 เป็นต้นไป ทั้งสองส่วนนี้จะถูกรวมเป็นส่วนเดียวกัน และจะยกเลิกการ
กำหนดใช้งาน io.flutter.embedding.android.SplashScreenDrawable ในไฟล์ AndroidManifest.xml
android > app > src > main > AndroidManifest.xml
ถ้ายังมีการกำหนดการใช้งาน ด้านล่างอยู่ เมื่อทำการ build ก็จะมีการแจ้งเตือนให้ทำการลบหรือยกเลิก
การใช้งานไป
<meta-data
              android:name="io.flutter.embedding.android.SplashScreenDrawable"
              android:resource="@drawable/launch_background"
              />
ให้เราทำการลบส่วนนี้ในไฟล์ AndroidManifest.xml ออกไปได้เลย
ในโปรเจ็คเริ่มต้นของ Flutter จะกำหนดการใช้งาน launch theme ในไฟล์ AndroidManifest.xml ดังนี้
ไฟล์ AndroidManifest.xml บางส่วน
<manifest xmlns:android="http://schemas.android.com/apk/res/android">
    <uses-permission android:name="android.permission.INTERNET" />
    <application
        android:label="Demo App"
        android:name="${applicationName}"
        android:icon="@mipmap/ic_launcher">
        <activity
            android:name=".MainActivity"
            android:exported="true"
........
.....
เป็นการกำหนดไฟล์ styles.xml และใช้งานส่วนของ style ที่ชื่อ LaunchTheme
android > app > src > main > res > values > styles.xml
ไฟล์ styles.xml
<?xml version="1.0" encoding="utf-8"?>
<resources>
    <style name="LaunchTheme" parent="@android:style/Theme.Light.NoTitleBar">
        <!-- Show a splash screen on the activity. Automatically removed when
             Flutter draws its first frame -->
        <item name="android:windowBackground">@drawable/launch_background</item>
    </style>
    <!-- Theme applied to the Android Window as soon as the process has started.
         This theme determines the color of the Android Window while your
         Flutter UI initializes, as well as behind your Flutter UI while its
         running.

         This Theme is only used starting with V2 of Flutter's Android embedding. -->
    <style name="NormalTheme" parent="@android:style/Theme.Light.NoTitleBar">
        <item name="android:windowBackground">?android:colorBackground</item>
    </style>
</resources>
ใน android app จะมีช่วงเวลาหนึ่งก่อนระบบจะเริ่มทำงาน จะมีการเตรียมระบบและกระบวนการทำงาน
ของ app ในขณะเกิดการทำงานนั้นขึ้น android มีการใช้งาน launch screen เพื่อใช้แสดงรูปภาพ ในขณะ
ที่กำลังรอ ในไฟล์ style ข้างต้น ส่วนแรกจะเป็นการกำหนดสำหรับ splash screen หรือ launch screen
ในชื่อ LaunchTheme
<style name="LaunchTheme" parent="@android:style/Theme.Light.NoTitleBar">
        <!-- Show a splash screen on the activity. Automatically removed when
             Flutter draws its first frame -->
    <item name="android:windowBackground">@drawable/launch_background</item>
<!-- <item name="android:windowFullscreen">false</item>-->
</style>
นอกจากนั้น ยังมีการกำหนด NormalTheme สำหรับใช้งานหลังจากที่ launch screen แสดงเสร็จก็จะแสดง
พื้นหลังของธีมตามค่าที่กำหนดในช่วงไม่กี่วินาทีก่อนเข้าสู่ app ค่าตามรูปแบบด้านล่างใช้ค่าสีพื้นหลังของระบบ
android เราสามารถปรับเปลี่ยนเป็นค่าอื่นได้ ในที่นี้เราไม่ได้สนใจส่วนนี้ เพราะเป็นส่วนที่แสดงสั้นๆ แทบจะไม่ทัน
สังเกต
<style name="NormalTheme" parent="@android:style/Theme.Light.NoTitleBar">
    <item name="android:windowBackground">?android:colorBackground</item>
</style>
ในการใช้งาน Launch screen เราสนใจส่วนของการกำหนด ใน style ที่ชื่อ LaunchTheme จะเห็นว่ามีการ
กำหนดการใช้งานไว้ในไฟล์ชื่อ launch_background.xml ในโฟลเดอร์ drawable
android > app > src > main > res > drawable > launch_background.xml
ไฟล์ launch_background.xml
<?xml version="1.0" encoding="utf-8"?>
<!-- Modify this file to customize your launch splash screen -->
<layer-list xmlns:android="http://schemas.android.com/apk/res/android">
    <item android:drawable="@android:color/white" />

    <!-- You can insert your own image assets here -->
    <!-- <item>
        <bitmap
            android:gravity="center"
            android:src="@mipmap/launch_image" />
    </item> -->
</layer-list>
ในไฟล์ข้างต้น คือมีการกำหนดการใช้งานเพียงค่าแสดงพื้นหลังสีขาว เป็นค่าเริ่มต้น
<item android:drawable="@android:color/white" />
การกำหนดชื่อสีไปตรงๆ โดยเปลี่ยนเป็นค่าที่ต้องการเลย จะไม่ได้สามารถทำได้ แต่เนื่องจาก
สีขาวเป็นค่าของระบบที่สามารถเรียกใช้งานได้ สมมติเราต้องการกำหนด splash screen เป็นพื้นหลัง
สีแดงและมีไอคอนของ app อยู่ตรงกลาง ก็สามารถทำได้ดังนี้ ขั้นแรกให้เราสร้างไฟล์สำหรับกำหนด
ค่าสีที่จะใช้ใน
android > app > src > main > res > values > colors.xml
ไฟล์ colors.xml
<?xml version="1.0" encoding="utf-8"?>
<resources>
    <color name="ic_launcher_background">#FFC0CB</color>
    <color name="red">#FF0000</color>
</resources>
เวลาใช้งานก็กำหนดในลักษณะนี้ ในไฟล์ launch_background.xml
<item android:drawable="@color/red" />
เมื่อเราได้ส่วนของสีพื้นหลังแล้ว ต่อไปก็กำหนดส่วนของรูป splash screen เราจะใช้รูปจากไอคอน
ในโฟลเดอร์ drawable-xxx ที่รองรับขนาดต่างๆ ในที่นี้จะเป็นแนวทางก่อน ก็จะได้เป้น
<item>
    <bitmap android:gravity="center" android:src="@drawable/ic_launcher_foreground" />
</item>
เป็นการแสดงรูปตรงกลาง โดยใช้รูปจากไฟล์ ic_launcher_foreground ในโฟลเดอร์ drawable-xxx ที่รองรับขนาดต่างๆ
ดังนั้นเราก็จะได้ไฟล์ launch_background.xml ในโฟลเดอร์ drawable และ drawable-v21 เป็นดังนี้
ไฟล์ launch_background.xml
<?xml version="1.0" encoding="utf-8"?>
<!-- Modify this file to customize your launch splash screen -->
<layer-list xmlns:android="http://schemas.android.com/apk/res/android">
    <item android:drawable="@color/red" />
    <item>
        <bitmap android:gravity="center" android:src="@drawable/ic_launcher_foreground" />
    </item>
</layer-list>
ค่า android:gravity สามารถกำหนดค่าเหล่านี้ได้
bottom, center, center_horizontal, center_vertical, clip_horizontal,
clip_vertical, end, fill, fill_horizontal, fill_vertical, left, right, start, หรือ top.
สมมติเช่น เราต้องการให้ใช้พื้นหลังเป็นรูปเล็กเรียงกันเต็มพื้นที่ แล้วซ้อนด้วยรูป splash ตรงกลาง
ก็จะกำหนดในลักษณะนี้ ถ้ารูปเราอยู่ในโฟลเดอร์ drawable-xxx ที่ขนาดต่างๆ
    <item>
        <bitmap android:gravity="fill" android:src="@drawable/background_splash" />
    </item>
    <item>
        <bitmap android:gravity="center" android:src="@drawable/splash" />
    </item>
ตอนนี้เราได้แนวทางการกำหนด splash screen เองแล้ว ก็สามารถหาข้อมูลเพิ่มเติม แล้วประยุกต์
ปรับแต่งได้ตามต้องการ อย่างไรก็ตาม เราสามารถลดขั้นตอนให้สะดวกและรวดเร็วขึ้น โดยใช้ package
ที่ชื่อว่า flutter_native_splash
สร้าง Splash Screen ด้วย flutter_native_splash
จะเป็น package ที่ทำให้เราสามารถสร้าง splash screen มาใช้งานได้ง่ายๆ เพียงแค่เตรียมรูปที่ต้องการ
จากนั้นตั้งค่า และรันคำสั่ง ตัว package ก็จะทำการจัดเตรียมและกำหนดค่าต่างๆ ให้เราอัตโนมัติ
ติดตั้ง flutter_native_splash มาใช้งาน
เนื่องจาก flutter_native_splash เป็น package เสริมที่ไม่ได้ใช้ทำงานใน app ของเราดังนั้นเราจึง
กำหนดใน dev_dependencies แทน โดยเพิ่มไปในไฟล์ pubspec.yaml ดังนี้
ไฟล์ pubspec.yaml บางส่วน
dev_dependencies:
  flutter_native_splash: ^2.4.1

flutter_native_splash:
  color: "#FF0000"
  image: "assets/splash.png"
  android_12:
    image: "assets/splash.png"
    color: "#FF0000"
  ios: false
  web: false
ข้างต้นเป็นการติดตั้ง flutter_native_splash และตั้งค่าการทำงานที่ต้องการเบื้องต้น คือ จะใช้สีพื้นหลังเป็น
สีแดง และใช้รูปจากโฟลเดอร์ assets > splash.png และใช้เฉพาะ android จึงปิดส่วนของ ios และก็ web
ออกไป สำหรับไฟล์ splash.png เราควรให้มีความคมชัดและขนาดใหญ่ อย่างน้อยควรเป็น 512x512 และเราต้อง
กำหนดสำหรับส่วนของ android 12 ขึ้นไปด้วย ซึ่งสำหรับรูปที่จะใช้มีรูปแบบที่ควรปรับดังนี้
ถ้าเป็นรูปไอคอนโปร่งใส ที่มีกำหนดสีพื้นหลัง ควรใช้รูปขนาด 960x960 pixels และ ให้ไอคอนอยู่ในวงกลมที่
มีเส้นผ่านศูนย์กลางขนาด 640 pixels
แต่ถ้าเป็นไอคอนที่ไม่ได้กำหนดสีพื้นหลัง ควรใช้รูปขนาด 1152x1152 pixels และให้ไอคอนอยู่ในวงกลมที่มี
เส้นผ่านศูนย์กลางขนาด 768 pixels
จากนั้นที่ terminal ให้เรารันคำสั่ง
dart run flutter_native_splash:create

เป็นอันเสร็จเรียบร้อย ดูผลลัพธ์ที่ได้

รูป splash screen ข้างต้น จะแสดงขึ้นมาในขณะที่ app กำลังเตรียมพร้อมทำงาน จะเห็นว่าสีพื้นหลังที่เรากำหนด
และรูป splash ที่เราใช้เป็นขนาด 512x512 ก็จะมีขนาดดังรูป ด้วยรูปแบบการตั้งค่าข้างต้นก็จะไดผลลัพธ์ตามตัวอย่าง
เราสามารถตั้งค่าให้รองรับ โหมดปกติ และโหมด dark ให้แสดงต่างกันได้ดังนี้
dev_dependencies:
  flutter_native_splash: ^2.4.1

flutter_native_splash:
  color: "#FF0000"
  image: "assets/splash.png"
  color_dark: "#042a49"
  image_dark: "assets/splash-invert.png"
  android_12:
    image: "assets/splash.png"
    color: "#FF0000"
  ios: false
  web: false
ดูการตั้งค่าเพิ่มเติมที่หน้าการใช้งาน package flutter_native_splash
นอกจาก package ข้างต้น ยังมี package อื่นๆ ที่รองรับการทำ splash screen แบบ animation หรือภาพ
เคลื่อนไหว ก็ขึ้นกับเราจะนำมาปรับใช้งาน อย่างไรก็ดีเพื่อการทำงานที่รวดเร็วและลดการทำงานที่ไม่จำเป็น
ควรใช้เป็น native ด้วย package ข้างต้นจะเป็นวิธีที่แนะนำ

