เนื้อหาต่อไปนี้ จะเป็นแนวทางเบื้องต้นในการดึงข้อมูลจาก google calendar โดยก่อนที่จะ
ทำการเรียกใช้งาน เราต้องมี API project และ client ID โดยรายละเอียดส่วนนี้ จะขอให้
ไปศึกษาจากบทความ
ประยุกต์ใช้งาน Google Sign In สำหรับล็อกอินเว็บไซต์ด้วย Google อย่างง่าย
https://www.ninenik.com/content.php?arti_id=725 via @ninenik
ให้ดูรายละเอียดที่หัวข้อ การสร้าง API project และ client ID เมื่อสร้างเรียบร้อยแล้ว
เราจะได้ client ID ไว้ใช้งาน
เปิดใช้งาน Google Calendar API
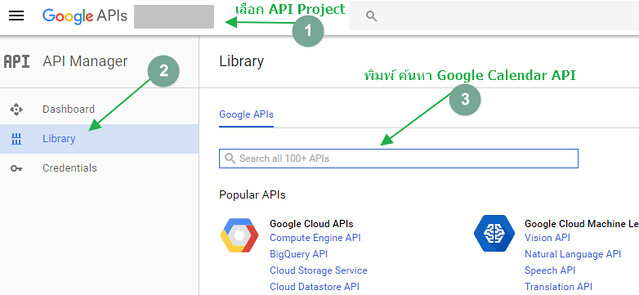
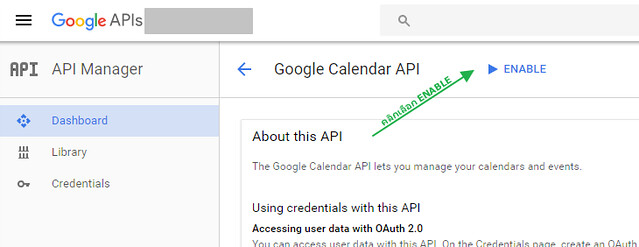
ต่อไปให้ทำการเปิดใช้งาน Google Calendar API ดังนี้
1. เลือก API Project ที่ต้องการ
2. เลือกเมนู Library แล้วพิมพ์ Google Calendar API ในช่องค้นหา Google APIs
3. พอเข้าไปใน Google Calendar API ให้กด ENABLE
สร้างไฟล์ทดสอบ สำหรับดึงข้อมูลกิจกรรมจาก Google Calendar
ดูตัวอย่างโค้ดได้ที่
ให้เราสร้างเป็นไฟล์นามสกุล php สมมติชื่อ google_calendar_01.php
<!DOCTYPE html>
<html>
  <head>
    <title>Google Calendar API Quickstart</title>
    <meta charset='utf-8' />
  </head>
  <body>
    <p>Google Calendar API Quickstart</p>

    <!--Add buttons to initiate auth sequence and sign out-->
    <button id="authorize-button" style="display: none;">Authorize</button>
    <button id="signout-button" style="display: none;">Sign Out</button>

    <pre id="content"></pre>

    <script type="text/javascript">
      // Client ID and API key from the Developer Console
      var CLIENT_ID = '<YOUR_CLIENT_ID>';

      // Array of API discovery doc URLs for APIs used by the quickstart
      var DISCOVERY_DOCS = ["https://www.googleapis.com/discovery/v1/apis/calendar/v3/rest"];

      // Authorization scopes required by the API; multiple scopes can be
      // included, separated by spaces.
      var SCOPES = "https://www.googleapis.com/auth/calendar.readonly";

      var authorizeButton = document.getElementById('authorize-button');
      var signoutButton = document.getElementById('signout-button');

      /**
       *  On load, called to load the auth2 library and API client library.
       */
      function handleClientLoad() {
        gapi.load('client:auth2', initClient);
      }

      /**
       *  Initializes the API client library and sets up sign-in state
       *  listeners.
       */
      function initClient() {
        gapi.client.init({
          discoveryDocs: DISCOVERY_DOCS,
          clientId: CLIENT_ID,
          scope: SCOPES
        }).then(function () {
          // Listen for sign-in state changes.
          gapi.auth2.getAuthInstance().isSignedIn.listen(updateSigninStatus);

          // Handle the initial sign-in state.
          updateSigninStatus(gapi.auth2.getAuthInstance().isSignedIn.get());
          authorizeButton.onclick = handleAuthClick;
          signoutButton.onclick = handleSignoutClick;
        });
      }

      /**
       *  Called when the signed in status changes, to update the UI
       *  appropriately. After a sign-in, the API is called.
       */
      function updateSigninStatus(isSignedIn) {
        if (isSignedIn) {
          authorizeButton.style.display = 'none';
          signoutButton.style.display = 'block';
          listUpcomingEvents();
        } else {
          authorizeButton.style.display = 'block';
          signoutButton.style.display = 'none';
        }
      }

      /**
       *  Sign in the user upon button click.
       */
      function handleAuthClick(event) {
        gapi.auth2.getAuthInstance().signIn();
      }

      /**
       *  Sign out the user upon button click.
       */
      function handleSignoutClick(event) {
        gapi.auth2.getAuthInstance().signOut();
      }

      /**
       * Append a pre element to the body containing the given message
       * as its text node. Used to display the results of the API call.
       *
       * @param {string} message Text to be placed in pre element.
       */
      function appendPre(message) {
        var pre = document.getElementById('content');
        var textContent = document.createTextNode(message + 'n');
        pre.appendChild(textContent);
      }

      /**
       * Print the summary and start datetime/date of the next ten events in
       * the authorized user's calendar. If no events are found an
       * appropriate message is printed.
       */
      function listUpcomingEvents() {
        gapi.client.calendar.events.list({
          'calendarId': 'primary',
          'timeMin': (new Date()).toISOString(),
          'showDeleted': false,
          'singleEvents': true,
          'maxResults': 10,
          'orderBy': 'startTime'
        }).then(function(response) {
          var events = response.result.items;
          appendPre('Upcoming events:');

          if (events.length > 0) {
            for (i = 0; i < events.length; i++) {
              var event = events[i];
              var when = event.start.dateTime;
              if (!when) {
                when = event.start.date;
              }
              appendPre(event.summary + ' (' + when + ')')
            }
          } else {
            appendPre('No upcoming events found.');
          }
        });
      }

    </script>

    <script async defer src="https://apis.google.com/js/api.js"
      onload="this.onload=function(){};handleClientLoad()"
      onreadystatechange="if (this.readyState === 'complete') this.onload()">
    </script>
  </body>
</html>
โดยให้เปลี่ยนส่วนของโค้ด <YOUR_CLIENT_ID> เป็น client ID ของเราที่ได้สร้างไปแล้ว
ในตอนต้น
ทดสอบเรียกไฟล์ตัวอย่างผ่าน browser สมมติไฟล์ทดสอบที่เครื่องมี path ที่
http://localhost/google_calendar/google_calendar_01.php จะได้หน้าตาของไฟล์
ตัวอย่างดังนี้
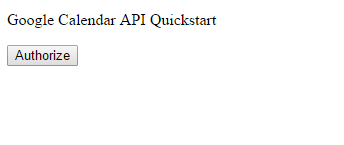
ให้กดที่ปุ่ม Authorize จะมี popup ขึ้นมาแสดงเพื่อขออนุญาตเข้าถึงข้อมูลปฎิทินของเรา
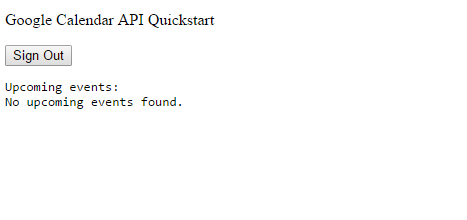
ให้กด Allow หน้าไฟล์ทดสอบเราก็จะเปลี่ยนไปดังรูป
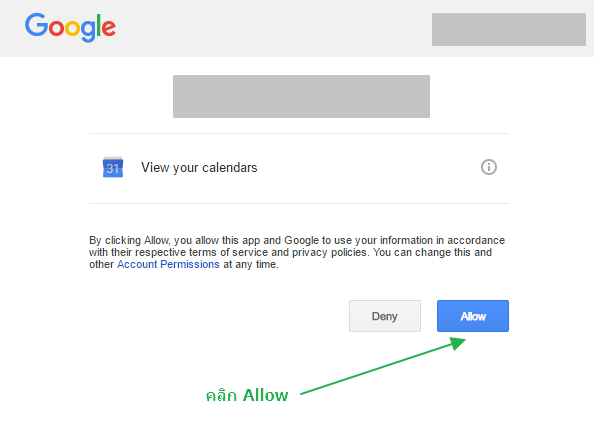
จากรูปไฟล์ตัวอย่าง จะเป็นการให้ไปทำการดึงข้อมูลกิจกรรม ของวันที่ตั้งวันปัจจุบันเป็นตันไป
จากรูปจะเห็นว่า ปฏิทิน ที่ใช้ทดสอบไม่มีข้อมูลของกิจกรรม จึงขึ้นแจ้งว่าไม่พบข้อมูลกิจกรรม
ในเร็วๆ นี้
มาดูส่วนของโค้ดที่ใช้ในการส่งค่าเพื่อไปดึงข้อมูล
function listUpcomingEvents() {
	  // ส่วนของโค้ดไปดึงข้อมูบกิจกรรมในปฏิทิน
	gapi.client.calendar.events.list({
	  'calendarId': 'primary',
	  'timeMin': (new Date()).toISOString(), // ดึงกิจกรรมของวันที่จากปัจจุบันเป็น้นไป
	  'showDeleted': false, // ไม่แสดงกิจกรรมที่ลบแล้ว
	  'singleEvents': true,
	  'maxResults': 10, // แสดงสูงสุดไม่เกิน 10 รายการ
	  'orderBy': 'startTime' // เรียงตามวันที่เวลา เริ่มของกิจกรรม
	}).then(function(response) {
	  var events = response.result.items; // คืนค่าเป็น object รายการกิจกรรม
	  appendPre('Upcoming events:');
	// ถ้ามีรายการ
	  if (events.length > 0) {
		  // วนลูปแสดง
		for (i = 0; i < events.length; i++) {
		  var event = events[i];
		  var when = event.start.dateTime;
		 if (!when) {
			when = event.start.date;
		  }
		  appendPre(event.summary + ' (' + when + ')')
		}
	  } else {
		appendPre('No upcoming events found.');
	  }
	});
}
รูปแบบโค้ดข้างต้น เป็นการใช้งาน javascript เราสามารถนำไปดัดแปลง เปลี่ยนไปใช้ใน
รูปแบบของ jquery ก็จะทำให้สามารถจัดการกับข้อมูลได้ง่ายขึ้น
จากโค้ดข้างต้น เราสามารถดึงข้อมูลกิจกรรมที่ผ่านมาแล้วได้ด้วยการกำหนดค่า
ในส่วนของ timeMin เช่น สมมติเราต้องการดึงข้อมูลในช่างตั้งแต่ วันที่ 1 ม.ค.
ก็สามารถปรับเป็นดังนี้ได้
'timeMin': (new Date('2017-01-01 00:00:00')).toISOString(),
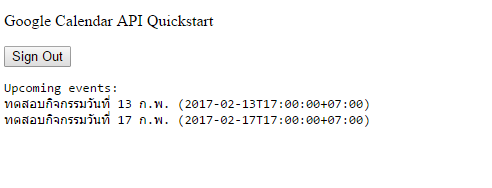
ต่อไป สมมติเราเข้าไปสร้าง กิจกรรมทดสอบขึ้นมา สองรายการ โดยเข้าไปสร้างได้ที่
จากนั้นกลับมาเรียกไฟล์ทดสอบของเราอีกที เราจะได้ข้อมูลกิจกรรม จากปฏิทิน เพิ่มเข้า
มาสองรายการ ดังรูป
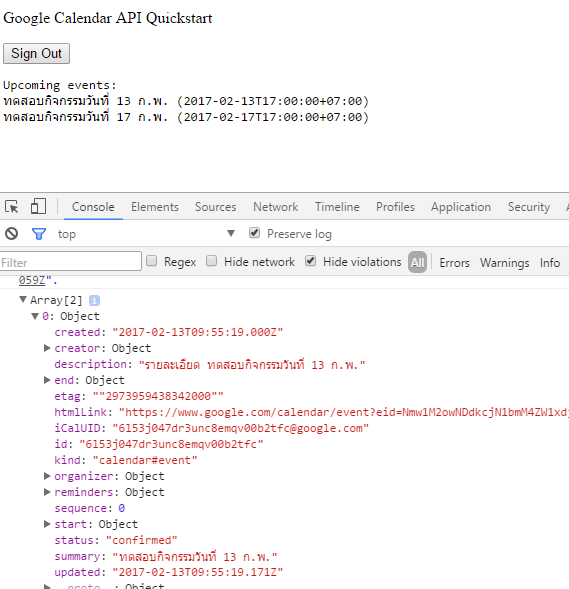
ข้อมูลต่างๆ ที่ถูกส่งกลับมา จากโค้ดตัวอย่าง จะอยู่ในชื่อ events
เราสามารถใช้คำสั่ง console.log() เพื่อ debug ดูค่า property อื่นๆ ได้
เท่านี้เราก็สามารถทำการดึงข้อมูลกิจกรรมจาก google calendar อย่างง่าย
มาใช้งาน
ยังไงก็ตาม ในส่วนของการใช้งานที่ซับซ้อน จำเป็นต้องศึกษาเพิ่มเติมจาก
ถ้ามีเนื้อหาเพิ่มเติม เกี่ยวกับการประยุกต์ใช้งาน google calendar จะนำเสนอ ในต่อๆ ไป

