การสร้างส่วนติดต่อกับผู้ใช้ให้มีชีวิตชีวาและแยกส่วนแสดงหลายๆอันในระบบ android เราจำเป็นต้องคลุม
องค์ประกอบต่างของ UI และการทำงานของ activity ให้อยู่ในรูปแบบของ module (ส่วนแยกจำเพาะ)
โดยสามารถแลกเปลี่ยนสื่อสาร เข้าและออกภายใน activity ได้ การสร้างส่วนแยกจำเพาะนี้ (ต่อไป
จะเรียกว่า module) ด้วยการใช้งาน Fragment class (คล้ายการใช้งาน iframe ในเว็บไซต์) ซึ่งทำงาน
เหมือนกับ activity ที่ถูกซ้อนกันไว้ โดยเราสามารถกำหนด layout และ จัดการวัฏจักรของตัวมันเองได้
เมื่อเรากำหนด layout ให้กับ fragment แล้ว เราสามารถที่จะออกแบบให้ fragment ต่างๆ แสดงรวมกัน
ใน activity ได้ เพื่อดัดแปลงโครงสร้างของ layout สำหรับการแสดงผลในหน้าจอที่ต่างกัน (อย่างเช่น
ถ้าหน้าจอขนาดเล็ก ก็อาจจะแสดงแค่ fragment เดียว แต่ถ้าหน้าจอใหญ่ หรือเป็น tablet ก็อาจจะกำหนดให้แสดง
2 fragment หรือมากกว่า เป็นต้น)
การสร้าง Fragment
อาจเข้าใจได้ว่า fragment คือส่วนของ model ย่อยของ activity ที่มีวัฏจักรของตัวเอง รับค่า event ของตัวเอง
และเรายังสามารถที่จะเพิ่มเข้ามาหรือลบออกในขณะที่ activity กำลังทำงานอยู่ (จัดแยกคล้ายๆ sub activity ที่เราสามารถ
เรียกใช้งานใน activity อื่นได้) ในบทความนี้จะแสดงวิธีการใช้งาน Fragment class ให้รองรับการใช้ Support Library
เพื่อให้ app สามารถรองรับอุปกรณ์ที่ run android เวอร์ชั่นเก่าๆ ได้
สร้าง fragment class ใน android studio
เราจะทดสอบเนื้อหาในตอนนี้จากการสร้าง project android ใน stuido ขึ้นมาใหม่ ใช้ชื่อ app ว่า Study003
หรือจะใช้ชื่ออื่นก็ได้ โดยในขึ้นตอนนี้สามารถกลับไปดูในบทความเก่าๆ ได้
ดูวิธีการสร้าง project ขึ้นมาใหม่ตามข้อที่ 1 จากบทความ
การเพิ่ม action button ใน action bar ตอนที่ 1
https://www.ninenik.com/content.php?arti_id=618 via @ninenik
จาก project ที่สร้างขึ้นมาให้เราไปดูที่ Java ชื่อ MainActivity จะได้ code ส่วนบนประมาณนี้
1 2 3 4 5 6 7 8 9 10 11 12 13 14 15 16 17 18 19 | package com.example.ninenik.study003;import android.support.v7.app.ActionBarActivity;import android.os.Bundle;import android.view.Menu;import android.view.MenuItem;public class MainActivity extends ActionBarActivity { @Override protected void onCreate(Bundle savedInstanceState) { super.onCreate(savedInstanceState); setContentView(R.layout.activity_main); }.....} |
สังเกตว่าจะมีการเรียกใช้งาน Support Library ตรงบรรทัด
import android.support.v7.app.ActionBarActivity;
หรือเรียกย่อๆ ว่า v7 appcompat library รองรับารใช้งาน action bar แต่เมื่อเรามีการใช้งาน fragment class นี้จะถูกเปลี่ยนนไปใช้
ตัวอื่นแทน อธิบายในบทความด้านล่างในลำดับต่อไป
ตัวอื่นแทน อธิบายในบทความด้านล่างในลำดับต่อไป
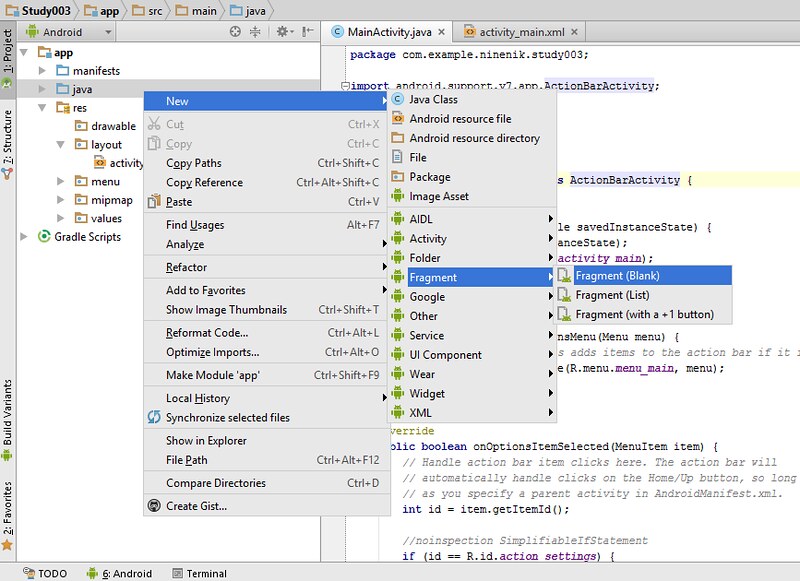
1. สร้าง fragment คลิกขวาที่โฟลเดอร์ java ตามรูป เลือก New > Fragment > Fragment (Blank)
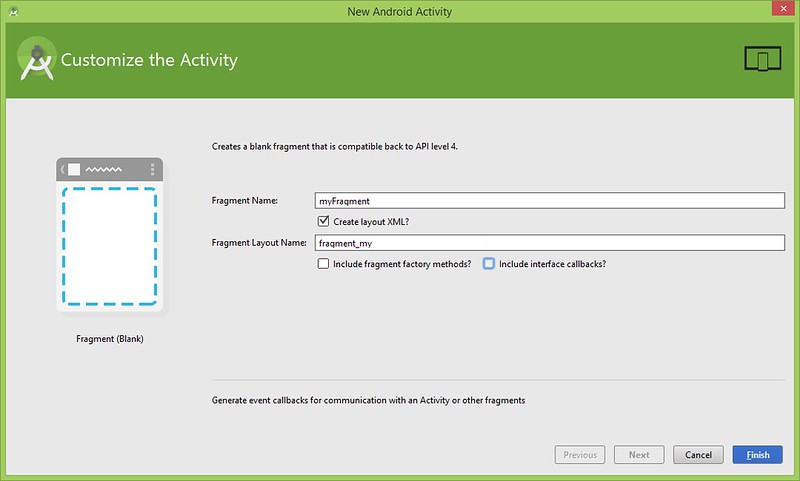
2. กำหนดชื่อ fragment name และ ก็ fragment layout ในตัวอย่างจะเปลี่ยนเป็น myFragment
กับ fragment_my ตามลำดับ ติ้กเลือก checkbox เฉพาะอันแรก (ส่วนอื่นยังไม่จำเป็นในตอนนี้)
- Create layout XML กำหนดให้สร้าง ไฟล์ fragment layout
- include fragment factory methods ให้เพิ่ม code fragment method เข้ามาด้วย
- include interface callback ให้เพิ่ม code รองรับการเรียกใช้จาก activity หรือการติดต่อกับ activity ได้
กำหนดเรียบร้อย ให้กดที่ปุ่ม Finish
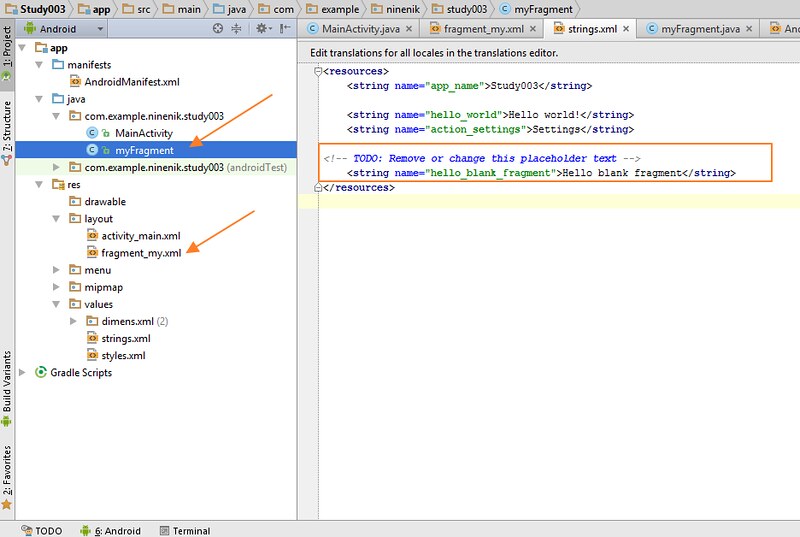
3. มาดู android studio สร้างอะไรมาให้เราบ้าง ซึ่งก็จะมี myFragment class และ ก็ fragment_my.xml
ตามรูป นอกนั้นก็จะมีการสร้าง string resource เพิ่มเข้ามา strings.xml
ต่อไปเรามาดูที่ไฟล์ fragment_my.xml (ถ้าเทียบแบบ code html ตามความเข้าใจอย่างง่ายก็คือ
ไฟล์ที่เราต้องการจะนำไปแสดง ใน iframe)
1 2 3 4 5 6 7 8 9 | android:layout_height="match_parent" tools:context="com.example.ninenik.study003.myFragment"> <!-- TODO: Update blank fragment layout --> <TextView android:layout_width="match_parent" android:layout_height="match_parent" android:text="@string/hello_blank_fragment" /></FrameLayout> |
ตามโครงสร้าง xml ของ fragment layout เราจะเห็นว่าจะคล้ายๆ กับ layout ของ activity ภายในก็จะมี view
object อยู่ อย่างใน code ก็จะเป็น TextView ซึ่งจะแสดงคำว่า Hello World
จาก code ด้านบน android studio จะสร้างรุปแบบ xml ออกมาค่อนข้างอ่านยาก เรามีวิธีที่ใช้สำหรับจัดรูปแบบ
ให้อ่าน code ง่ายขึ้น ด้วยเครื่องมือของ android studio ทำได้ดังนี้
ลากคลุม code ที่ต้องการจัดรูปแบบ แล้วไปที่เมนู Code > Reformat Code... (หรือกดปุ่ม Ctrl+Alt+L)


เลือกจัดรูปแบบตามการทำงาน แล้วกด Run เราก็จะได้ code ที่ดูง่ายขึ้น เราจะเปลี่ยนตรงข้อความของ
TextView ให้แสดงข้อความว่า I am a Fragment จะได้ไฟล์ fragment_my.xml ดังนี้
1 2 3 4 5 6 7 8 9 10 11 12 13 | android:layout_width="match_parent" android:layout_height="match_parent" tools:context="com.example.ninenik.study003.myFragment"> <!-- TODO: Update blank fragment layout --> <TextView android:layout_width="match_parent" android:layout_height="match_parent" android:text="I am a Fragment" /></FrameLayout> |
4. ต่อไปเราจะเพิ่ม fragment เข้าใปใน layout ของ activity หลักที่ไฟล์ activity_main.xml
(ถ้าอธิบายตามความเข้าใจในรูปแบบ code html ไฟล์ activity_main.xml ก็คือไฟล์หลักที่เรียก
ใช้งาน iframe)
1 2 3 4 5 6 7 8 9 10 11 | android:layout_height="match_parent" android:paddingLeft="@dimen/activity_horizontal_margin" android:paddingRight="@dimen/activity_horizontal_margin" android:paddingTop="@dimen/activity_vertical_margin" android:paddingBottom="@dimen/activity_vertical_margin" tools:context=".MainActivity"> <TextView android:text="@string/hello_world" android:layout_width="wrap_content" android:layout_height="wrap_content" /></RelativeLayout> |
จัดรูปแบบหน่อย และก็ลบ TextView ออก เราจะใช้ fragment แทรกเข้าไปแทน และก็เปลี่ยนโครงสร้างของ layout
จาก RelativeLayout เป็น LinearLayout แบบแสดงแนวนอน ลบ padding ออก กำหนดความกว้าง
และสูงให้ขยายเต็มจอของ app โดยใช้ match_parent จะได้เป็น
1 2 3 4 5 6 7 8 | android:layout_width="match_parent" android:layout_height="match_parent" android:orientation="horizontal" ></LinearLayout> |
5. แทรก fragment element เข้าไป ดังนี้ (เทียบเหมือนแทรก iframe ลงใน code html)
สังเกตตรง android:name="com.example.ninenik.study003.myFragment" ค่า จะเท่ากับ
ชื่อ package ต่อด้วย class ของ fragment
1 2 3 4 5 | <fragment android:name="com.example.ninenik.study003.myFragment" android:id="@+id/my_fragment" android:layout_weight="1" android:layout_width="0dp" android:layout_height="match_parent" /> |
จะได้เป็น
1 2 3 4 5 6 7 8 9 10 11 12 13 | android:layout_width="match_parent" android:layout_height="match_parent" android:orientation="horizontal" > <fragment android:name="com.example.ninenik.study003.myFragment" android:id="@+id/my_fragment" android:layout_weight="1" android:layout_width="0dp" android:layout_height="match_parent" /></LinearLayout> |
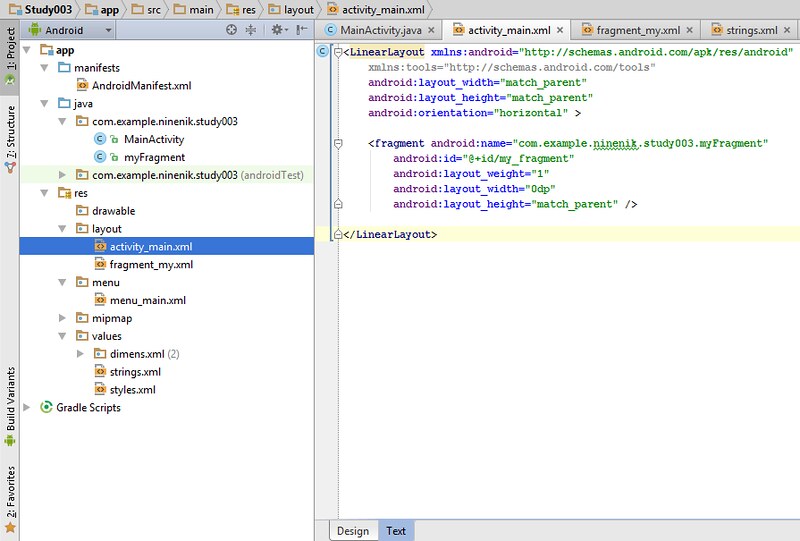
6. เรียกใช้ layout ที่มีการกำหนดการใช้งาน มาใช้ใน MainActivity โดยให้เราเปลี่ยนค่าการ extents
จาก ActionBarActivity เป็น FragmentActivity
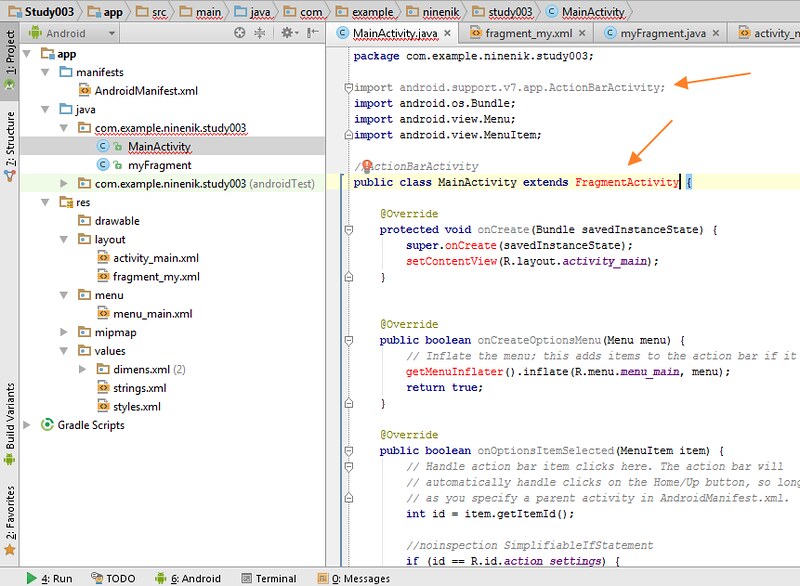
สังเกตว่า code จะเป็นสีแดง และ class
import android.support.v7.app.ActionBarActivity; จะกลายเป็นสีเทา เนื่องจากเราไม่ด้ใช้งานแล้ว
เราสามารถลบออกได้
เราจะ import class อื่นมาแทน คลิกที่ข้อความสีแดง แล้วกดปุ่ม Alt+Enter พร้อมกัน แล้วเลือก import class
import android.support.v4.app.FragmentActivity;
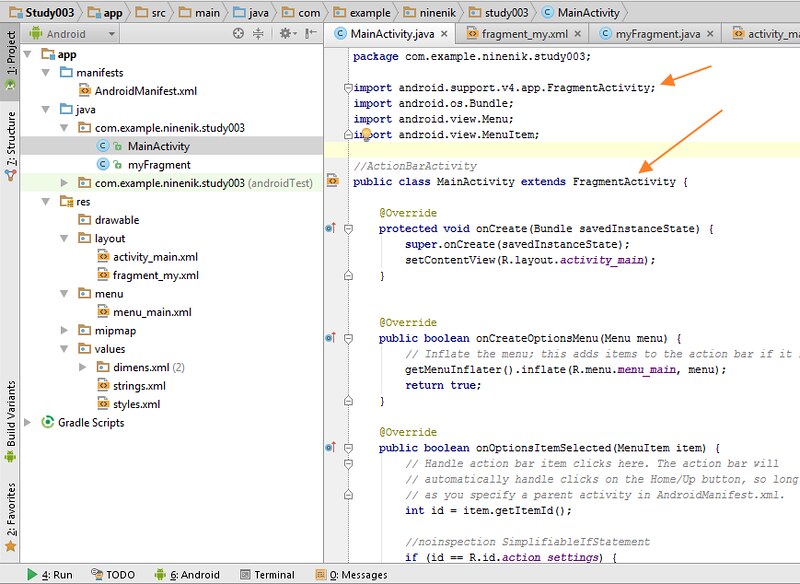
7. เท่านี้เราก็สามารถทดสอบ run app เพื่อดูการทำงานได้ โดยเมื่อ app run ขึ้นมา ก็จะไปเรียกใช้งาน
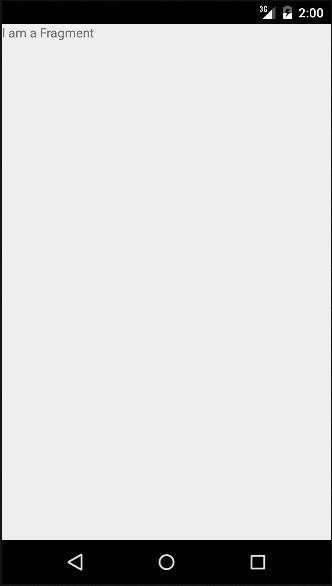
fragment และดึง layout ของ fragment มาแสดงซึ่งเรากำหนดค่าใน TextView เพื่อทดสอบแล้ว
หากไม่มีอะไรผิดพลาด app เราจะรันออกมาในลักษระตามนี้
ก่อนจบเกี่ยวกับการใช้งาน fragment อย่างง่ายตอนแรกนี้ เรามาดู code ของ class fragment ที่เราสร้าง
ที่ชื่อ myFragment
1 2 3 4 5 6 7 8 9 10 11 12 13 14 15 16 17 18 19 20 21 22 23 24 25 26 27 28 | package com.example.ninenik.study003;import android.os.Bundle;import android.app.Fragment;import android.view.LayoutInflater;import android.view.View;import android.view.ViewGroup;/** * A simple {@link Fragment} subclass. */public class myFragment extends Fragment { public myFragment() { // Required empty public constructor } @Override public View onCreateView(LayoutInflater inflater, ViewGroup container, Bundle savedInstanceState) { // Inflate the layout for this fragment return inflater.inflate(R.layout.fragment_my, container, false); }} |
ส่วนที่เรียกใช้งาน layout ของ fragment จะอยู่ใน onCreateView() method ตามรูป


