จากตอนที่แล้ว เราได้รู้จักวิธีการสร้าง attribute directive ที่ใช้สำหรับเป็น property ของ
DOM element หรือ directive รวมทั้งมีการใช้งาน input property ในการนำค่าเข้าไป
ใช้งานใน directive class กันไปแล้ว
"ทบทวนได้ที่บทความ"
การสร้าง Attribute Directive สำหรับใช้งาน ใน Angular
https://www.ninenik.com/content.php?arti_id=791 via @ninenik
สำหรับเนื้อหาในตอนต่อไปนี้ เราจะมาดูวิธีการสร้าง attribute directive ที่ใช้เป็น event กัน
รูปแบบเกี่ยวกับ event นั้น เราได้อธิบายไปแล้วในหลายๆ ส่วน สามารถย้อนไปทบทวนได้ที่หัวบทความต่อไปนี้
เพิ่เติมได้
การรับค่า input จาก user ใน Angular App เบื้องต้น
https://www.ninenik.com/content.php?arti_id=769 via @ninenik
"หัวข้อ การเชื่อมโยงด้วย event - Event binding ( (event) )"
การเชื่อมโยงข้อมูล Data Binding รูปแบบต่างๆ ใน Angular
https://www.ninenik.com/content.php?arti_id=787 via @ninenik
สร้าง attribute directive สำหรับกำหนด Event
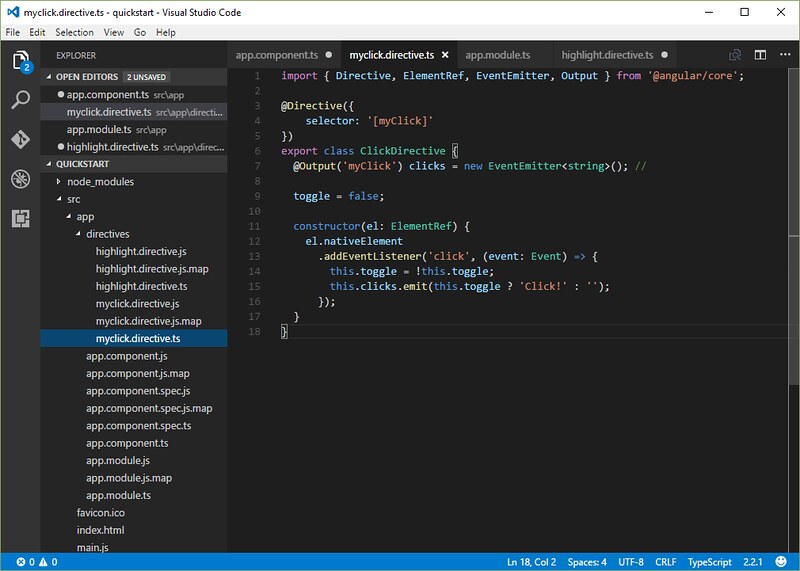
ให้เราสร้างไฟล์ชื่อ myclick.directive.ts ไว้ในไฟล์เดอร์ directives และกำหนดรายละเอียดไฟล์ดังนี้
ไฟล์ myclick.directive.ts
import { Directive, ElementRef, EventEmitter, Output } from '@angular/core';

@Directive({
    selector: '[myClick]'
})
export class ClickDirective {
  @Output('myClick') clicks = new EventEmitter<string>(); //

  toggle = false;

  constructor(el: ElementRef) {
    el.nativeElement
      .addEventListener('click', (event: Event) => {
        this.toggle = !this.toggle;
        this.clicks.emit(this.toggle ? 'Click!' : '');
      });
  }
}
เรามาไล่เรียงโค้ดไปแต่ละส่วนกัน ส่วนแรกเป็นการ import class ต่างๆ ที่จำเป็นในการใช้งาน
โดยสองอันแรก Directive และ ElementRef เราคงพอคุ้นกันไปบ้างแล้วจากบทความที่่ผ่านมา
import { Directive, ElementRef, EventEmitter, Output } from '@angular/core';
- Directive สำหรับใช้ในการกำหนด @Directive decorator เพื่อใช้งาน คล้ายๆ กับกรณีที่เรา
import Component เพื่อใช้งาน @Component decorator
- ElementRef ใช้สำหรับนำเข้าไปใน directive class โดยอ้างอิง DOM element ที่เราทำการเชื่อมโยง
โดยการกำหนด attribute ที่เราสร้าง
- EventEmitter ใช้สำหรับเป็นตัวที่ปล่อย event ที่กำหนดเองออกมาใช้งานกับ element ในลักษณะ
ของ property
- Output ใช้สำหรับกำหนดให้สามารถนำค่าที่ได้จาก directive class ซึ่งโดยปกติจะออกมาในรูปตัวแปร
$event object เพื่อนำไปใช้งานใน component หรือ directive อื่นต่อ
ส่วนต่อมา
@Directive({
    selector: '[myClick]'
})
ส่วนนี้เป็นส่วนของ @Directive decorator ฟังก์ชั่น ที่ประกอบด้วยชุดข้อมูลของ directive หรือ directive metadata
โดย @Directive ใช้รูปแบบของ CSS selector ในการกำหนดค่าให้กับ selector ที่จะใช้ใน template เพื่อเชื่อมให้
สันพันธ์กับ directive
รูปแบบของ CSS selector สำหรับกำหนดเป็น attribute ก็คือใช้ชื่อ attribute ไว้ในปีกกาสี่เหลี่ยม ตามตัวอย่าง
ด้านบน [myClick] โดย Angular จะกำหนดให้ทุกๆ element มี event attribute ชื่อ "myClick"
ต่อมาเป็นส่วนของ directive controller class หรือส่วนของ directive class ที่กำหนดการทำงานของ directive
export class ClickDirective {
  @Output('myClick') clicks = new EventEmitter<string>(); //

  toggle = false;

  constructor(el: ElementRef) {
    el.nativeElement
      .addEventListener('click', (event: Event) => {
        this.toggle = !this.toggle;
        this.clicks.emit(this.toggle ? 'Click!' : '');
      });
  }
}
ใน ClickDirective class เราจะเห็นว่ามีการกำหนด @Output decorator เพื่อสำหรับกำหนด output property
ที่ใช้ชื่อเรียกแทนว่า "myClick" แทน clicks ซึ่งเป็น output property ที่เราจะส่งค่าออกไปยัง template
@Output('myClick') clicks = new EventEmitter<string>();
เนื่องจาก output property ของเราเป็น event เราจึงทำการกำหนดการสร้างตัวปล่อย event ด้วย "EventEmitter"
new EventEmitter<string>();
สังเกตตรง <string> รูปแบบนี้เป็นรูปแบบการใช้งาน generic type variable ใน TypeScript
โดย EventEmitter clsss มีการกำหนด type parameter และเราเรียก class ลักษณะนี้ว่า generic class
หรือพูดได้ว่า EventEmitter clsss มีการรับค่า type เข้าไปด้วยหรือมีการส่งค่า ประเภทของตัวแปรเข้าไป
กำหนดใช้งานใน class อย่างตัวอย่างข้างตัน กำหนดตัวแปร string เข้าไปใน EventEmitter class
เรามาดูตัวอย่างเพิ่มเติมเกี่ยวกับ generic class กันนิดหน่อย ดังนี้
ใน generic class จะมีการกำหนด generic type parameter ไว้ในปีกกาสามเหลี่ยม (<>) ดูตัวอย่างต่อไปนี้
class GenericNumber<T> { // class นี้แค่ทำการกำหนดประเภทตัวแปร
    zeroValue: T;
    add: (x: T, y: T) => T; // ฟังก์ชั่่นรูปแบบ arrow function
}

let myGenericNumber = new GenericNumber<number>();
myGenericNumber.zeroValue = 0; // กำหนดค่า zeroValue
myGenericNumber.add = function(x, y) { return x + y; }; // กำหนดฟังก์ขั่น
จากรูปแบบการกำหนดด้านบน เรากำหนด generic type parameter เป็น number
type ของ property ต่างๆ ใน class ก็จะเป็น number รวมถึง ฟังก์ชั่น add ก็คืนค่าเป็น number
กลับมาที่โค้ดของเรา
@Output('myClick') clicks = new EventEmitter<string>();
ตัวปล่อย event ที่สร้างจาก EventEmitter class ก็จะปล่อยค่าตัวแปรที่เป็น string มาไว้ใน "clicks"
ซึ่งเป็น output property ดังนั้น event ที่เราสร้างนี้จะปล่อยตัวแปรประเภท string ออกมา
บรรทัดต่อมา
toggle = false;
ส่วนนี้ไม่มีอะไร เป็นการกำหนดตัวแปรไว้ใช้งาน คล้ายๆ กำหนด property ของ component
ในที่นี้เรากำหนด "toggle" เป็น boolean มีค่า ค่าเริ่มต้นเป็น false; เราสามารถกำหนดแบบระบุ
ประเภทตัวแปรเข้าไปแบบนี้ก็ได้ toggle:boolean = false;
ส่วนต่อมาเป็นส่วนของฟังก์ชั่น constructor()
  constructor(el: ElementRef) {
    el.nativeElement
      .addEventListener('click', (event: Event) => {
        this.toggle = !this.toggle;
        this.clicks.emit(this.toggle ? 'Click!' : '');
      });
  }
สังเกตว่ามีการนำเข้า ElementRef เพื่อใช้สำหรับอ้างอิง DOM element ที่เราต้องการจัดการ ใช้งาน
คล้ายกับการใช้งานในกรณีการสร้าง attribute directive เพื่อใช้เป็น property
el.nativeElement ก็คือการอ้างอิง DOM element สมมติเรากำหนด event นี้ไว้กับ <div> element
เช่น
<div (myClick)="statement"> event attribute </div>
หากรูปแบบการนำไปใช้งานเป็นในลักษณะด้านบน
el.nativeElement ก็เท่ากับ document.getElementsByTagName('div')[0]
โดยเมื่อเราได้ตัวอ้างอิง DOM element แล้วเราก็กำหนดให้เมื่อมีการ "click" เกิดขื้น โดยใช้คำสั่ง
ตรวจจับ "click" event ของ JavaScript ปกติด้วย addEventListener('clicl',function(){});
แล้วให้ทำงานในฟังก์ชั่น ที่กำหนด โดยส่ง event object เป็น parameter เข้าไปในฟังก์ชั่นด้วย
แต่ในตัวอย่างเราไม่ได้ใช้ event object ทำอะไร คำสั่งที่ทำงานด้านในมีแค่
this.toggle = !this.toggle; // ให้ค่าเปลี่ยนเป็นค่าตรงข้าม เมื่อคลิก ใช้ ! เป็นนิเสธหรือค่าตรงข้าม
เช่นค่าเดิมเป็น false พอคลิกก็เป็น true พอคลิกอีกก็เป็น false สลับไปเรื่อยๆ
บรรทัดต่อมา ส่วนนี้เป็นส่วนสำคัญ
this.clicks.emit(this.toggle ? 'Click!' : '');
ตัวปล่อย Event ที่เราสร้างขึ้น EventEmitter จะใช้คำสั่ง emit() ในการปล่อย event ออกมา
ในรูปแบบ EventEmitter.emit(payload)
EventEmitter ก็คือ this.clicks เป็นตัวแปร output property
payload ก็คือตัว $event object ที่เราจะส่งออกมา ในที่นี้เราส่ง string ออกมา
ตามเงื่อนไขของค่า toggle
this.toggle ? 'Click!' : ''
ถ้า toggle เป็น true ส่งข้อความคำว่า 'Click!' ออกมา ถ้าเป็น false ส่งค่าว่างออกมา
ดังนัน้เมื่อเราคลิกที่ element ที่มีการใช้งาน event attribute นี้ เราก็จะได้ตัวแปร $event ออกมาเป็นข้อความ
'Click!' พอคลิกอีกทีก็จได้ข้อความออกมาเป็นค่าว่าง
การใช้งาน event attribute
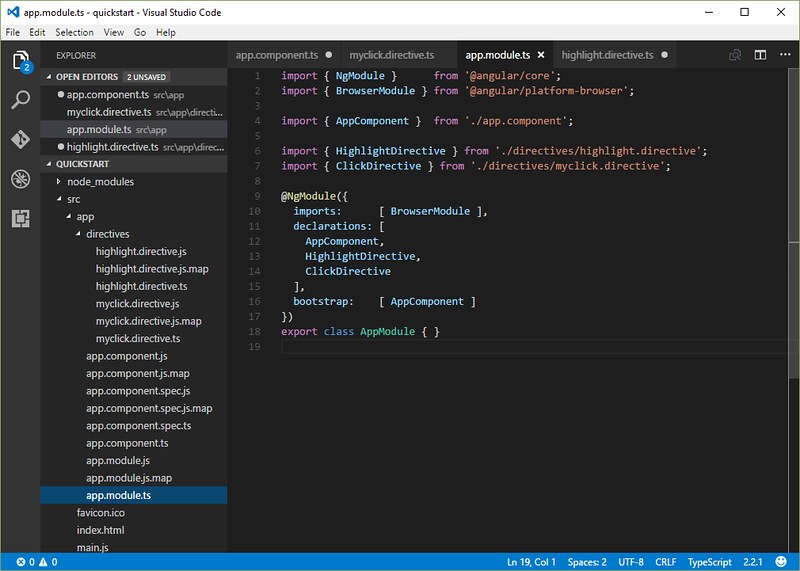
หลังจากที่เราได้สร้าง event attribute directive อย่างง่ายมาแล้ว ต่อไปเราจะทำการเรียกใช้งาน แต่ก่อนอื่น
เราต้องทำการ import class และกำหนด declarations ในไฟล์ app.module.ts ก่อน อันนี้
เป็นข้อควรจำเสมอๆ กรณีมีการใช้งาน class ภายใน app ของเรา ก่อนเรียกใช้งาน
ไฟล์ app.module.ts
import { NgModule }      from '@angular/core';
import { BrowserModule } from '@angular/platform-browser';

import { AppComponent }  from './app.component';

import { HighlightDirective } from './directives/highlight.directive';
import { ClickDirective } from './directives/myclick.directive';

@NgModule({
  imports:      [ BrowserModule ],
  declarations: [
    AppComponent,
    HighlightDirective,
    ClickDirective
  ],
  bootstrap:    [ AppComponent ]
})
export class AppModule { }
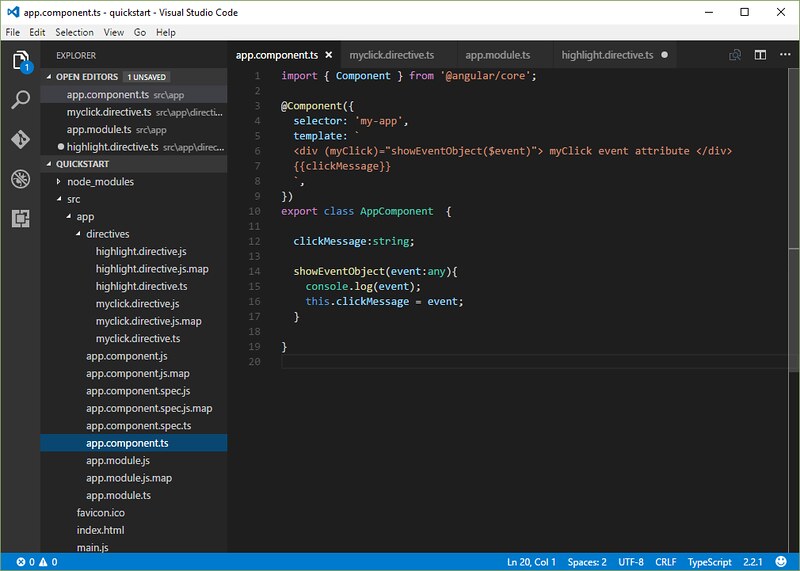
จากนั้นเรียกใช้งานในไฟล์ app.component.ts ดังนี้
ไฟล์ app.component.ts
import { Component } from '@angular/core';

@Component({
  selector: 'my-app',
  template: `
  <div (myClick)="showEventObject($event)"> myClick event attribute </div>
  {{clickMessage}}
  `,
})
export class AppComponent  {

  clickMessage:string;

  showEventObject(event:any){
    console.log(event);
    this.clickMessage = event;
  }

}
รูปแบบการใช้งานข้างบน เราทำการเชื่อมโยงข้อมูลด้วย event ที่เรากำหนดขึ้นมาเองชื่อ (myClick) โดยใช้ชื่อ
เรียกแทน "myClick" แทน output property ที่ชื่อ "clicks" ออกมายัง template หรือมายัง element ที่มีการ
เรียกใช้งาน เพื่อนำค่าไปใช้งานในคำสั่ง showEventObject() ส่งเป็น parameter ผ่านตัวแปร $event object
เข้าไป ซึ่งเรารู้อยู่แล้วว่า $event object ที่ส่งออกมานั้นเป็นคำว่า 'click!' หรือ '' ค่าว่าง
ในคำสั่ง เราเอาค่าที่ส่งออกมาไปกำหนดให้กับตัวแปร clickMessage เพื่อแสดงผลลัพธ์
ดูตัวอย่างการทำงานจากลำดับการทำงานดังนี้
เมื่อเรารันครั้งแรก ตัวปล่อย event ได้ทำการกำหนด 'myClick' event ให้กับ <div> element
เรียบร้อยแล้ว โดยจะส่งค่า $event object ออกมาทันทีที่มี 'myClick' event เกิดขึ้น
ดัวอย่างผลล้พธ์เริ่มต้นยังไม่มีอะไร

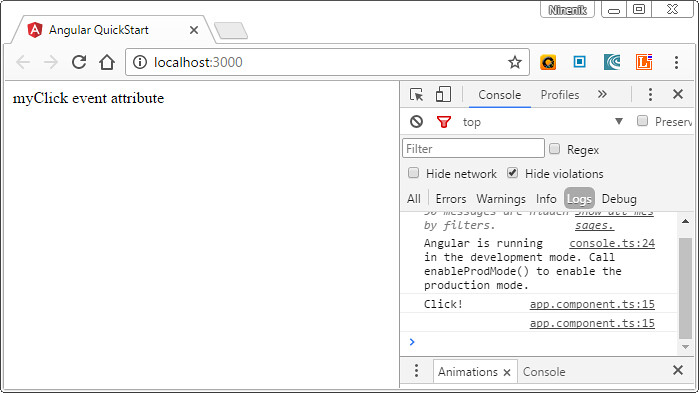
แต่เมื่อเราคลิกที่ <div> element ตัวปล่อย event ก็จะทำการส่ง $event object ออกมาเป็นข้อความ 'Click!'
แสดงดังรูป
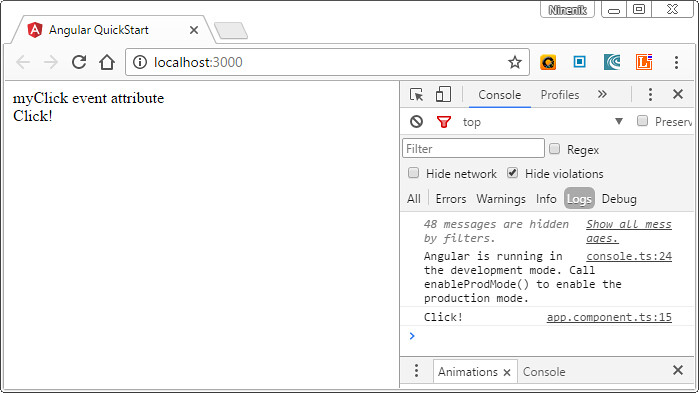
และเมื่อเราคลิกอีกครั้ง ตัวปล่อย event ก็จะทำการส่ง $event object ออกมาเป็นข้อความ แต่ทีนี่เป็นข้อความ
ว่าง สังเกตจากค่าตัวแปร clickMessage ที่เป็นค่าว่าง เหมือนกับข้อความ 'Click!' ก่อนหน้าหายไป
จะคล้ายรูปแรก แต่ให้สังเกตตรง console จะเห็นว่ามีการส่งค่าออกมา แต่เป็นค่าว่าง ดังรูป
การกำหนด Input Output property ใน component
ตอนนี้เราได้รู้จักวิธีการสร้าง attribute directive สำหรับใช้งานในรูปแบบ property attribute อย่าง
[myHighlight] ในบทความตอนที่ผ่านมา และรูปแบบ event attribute อย่าง (myClick) ในบทความนี้ไปแล้ว
ซึ่งเมื่อเราเรียกใช้งานผ่าน HTML element พื้นฐานทั่วไป หรือ component directive เราก็สามารถนำ
attribute เหล่านี้ไปกำหนดใช้งานได้ เพราะ attribute ที่เราสร้างขึ้น มีสถานะเป็น public เพราะเรามีการกำหนด
input property หรือ output property ด้วยการใช้งาน @Input decorator และ @Output decorator
ทำให้สามารถเรียกใช้งานหรือเข้าถึงจาก element หรือ directive ใดก็ได้
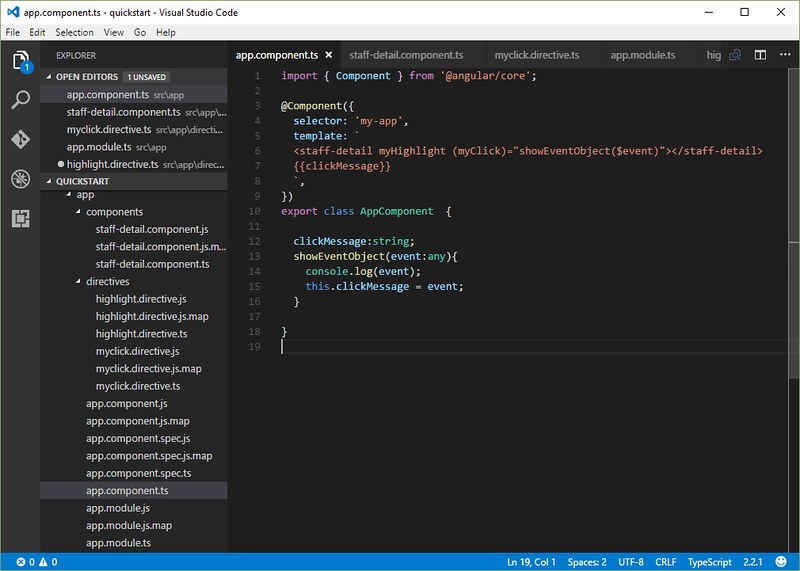
ไฟล์ app.component.ts
import { Component } from '@angular/core';

@Component({
  selector: 'my-app',
  template: `
  <staff-detail myHighlight (myClick)="showEventObject($event)"></staff-detail>
  {{clickMessage}}
  `,
})
export class AppComponent  {

  clickMessage:string;
  showEventObject(event:any){
    console.log(event);
    this.clickMessage = event;
  }

}
จากโค้ดด้านบนจะเห็นว่า AppComponent มีการใช้ <staff-detail> component directive
พร้อมทั้งมีการเรียกใช้งาน attribute directive ที่เราสร้างขึ้นมาจากไฟล์ highlight.directive.ts และ
myclick.directive.ts
ทีนี้เรามาลองสร้าง Input Output property เพื่อใช้งานใน component directive กันดู สมมติ
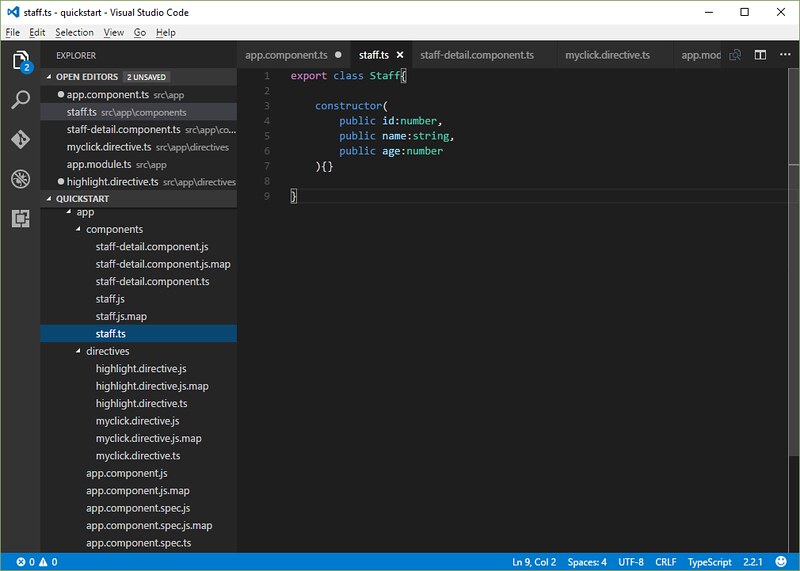
ก่อนอื่นให้เราสร้างไฟล์ staff.ts เป็นไฟล์ที่กำหนด property ต่างๆของ staff class สร้างไว้ในโฟลเดอร์
components ดังนี้
ไฟล์ staff.ts
export class Staff{

    constructor(
        public id:number,
        public name:string,
        public age:number
    ){}

}
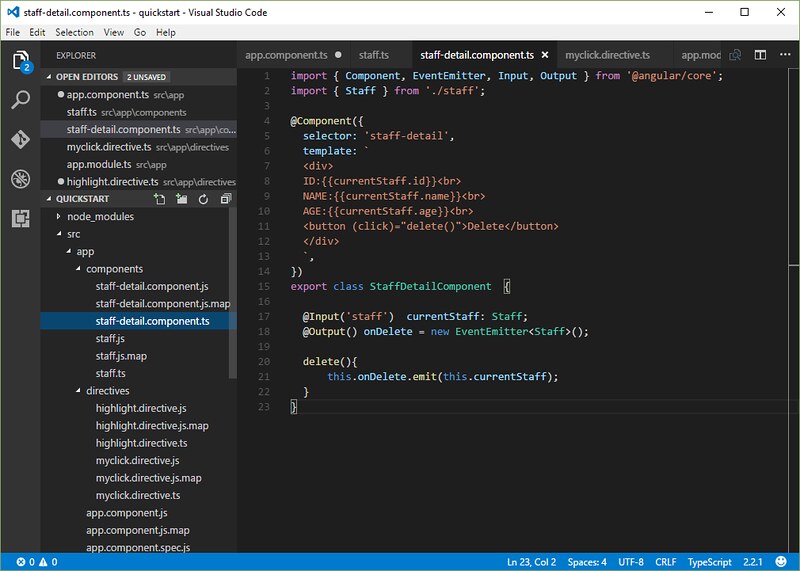
จากนั้นสร้างไฟล์ staff-detail.component.ts ที่เราจะใช้เป็น component directive ที่ชื่อ <staff-detail>
ไฟล์ staff-detail.component.ts
import { Component, EventEmitter, Input, Output } from '@angular/core';
import { Staff } from './staff';

@Component({
  selector: 'staff-detail',
  template: `
  <div>
  ID:{{currentStaff.id}}<br>
  NAME:{{currentStaff.name}}<br>
  AGE:{{currentStaff.age}}<br>
  <button (click)="delete()">Delete</button>
  </div>
  `,
})
export class StaffDetailComponent  {

  @Input('staff')  currentStaff: Staff;
  @Output() onDelete = new EventEmitter<Staff>();

  delete(){
      this.onDelete.emit(this.currentStaff);
  }
}
บรรทัดแรกสุดเรามีการใช้งานทั้ง Input Output และ EventEmitter จึงต้องทำการ
import class เหล่านี้เข้ามาใน component ก่อน
import { Component, EventEmitter, Input, Output } from '@angular/core';
ต่อด้วยการ import Staff class ซึ่งเป็น class ที่กำหนด หน้าตาของ Staff object ว่ามีอะไรบ้าง
เข้ามาใช้งานใน component
import { Staff } from './staff';
ต่อมาในส่วนของ @Component decorator ฟังก์ชั่น เรากำหนด selector เป็น 'staff-detail' ตัว selector
นี้ก็เหมือนกับเราทำการกำหนด <staff-detail> directive ไว้ใช้งานนั่นเอง
ต่อมาเป็นส่วนของ template ทำการแสดงข้อมูลของ staff ที่กำลังใช้งานอยู่ ผ่าน input property ที่ชื่อ
currentStaff ที่กำหนดใน component class รวมทั้งมีปุ่มที่เชื่อมโยงกับ event 'click'
ทำคำสั่ง delete() ที่กำหนดใน component class เช่นกัน
ส่วนต่อมาเป็น StaffDetailComponent class เป็นส่วนจัดการการทำงานของ component
ในนีเรามีการใช้งาน input และ output property
@Input('staff') currentStaff: Staff;
เรากำหนด input property เพื่อรับค่า property ที่ชื่อ currentStaff มี type เป็น staff object
โดยเรากำหนดเรียกใช้ผ่านชื่อเรียกแทนว่า "staff" วิธีนำไปใช้งานก็คือกำหนดในปีกกาสี่เหลี่ยม
[staff] ค่า currentStaff เป็น object ถูกนำไปแสดงใน template ด้านบน ตามโครงสร้างของ staff object
ประกอบไปด้วย id,name และ age
@Output() onDelete = new EventEmitter<Staff>();
ส่วนต่อมา เรากำหนด output property ชื่อ onDelete เพื่อส่งออกค่า $event object มี type เป็น staff object
วิธีนำไปใช้งานก็คือกำหนดในวงเล็บ (onDelete) โดย onDelete จะปล่อย event ออกไปเมื่อคำสั่ง delete()
ทำงาน หรือเมื่อคลิกที่ปุ่มใน template ด้านบน
  delete(){
      this.onDelete.emit(this.currentStaff);
  }
ตัวแปร $event object ที่ถูกปล่อยออกไปก็คือ ค่า this.currentStaff หรือก็คือค่าของ input property ที่ชื่อ
currentStaff ที่ถูกส่งเข้ามาเพื่อแสดงข้อมูลใน template
การเรียกใช้งาน Input Output property ใน component directive
หลังจากที่เราได้สร้าง input property และ output property ให้กับ component แล้ว ต่อไปเราจะมาดูวิธีการ
เรียกใช้งานใน component directive ให้เราแก้ไขไฟล์ app.component.ts เป็นดังนี้
ไฟล์ app.component.ts
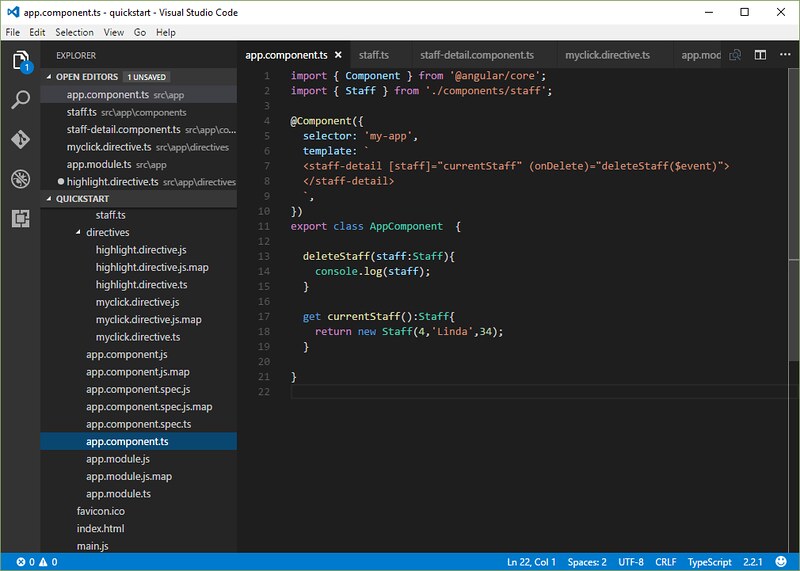
import { Component } from '@angular/core';
import { Staff } from './components/staff';

@Component({
  selector: 'my-app',
  template: `
  <staff-detail [staff]="currentStaff" (onDelete)="deleteStaff($event)">
  </staff-detail>
  `,
})
export class AppComponent  {

  deleteStaff(staff:Staff){
    console.log(staff);
  }

  get currentStaff():Staff{
    return new Staff(4,'Linda',34);
  }

}
สังเกตว่าใน template เรามีการใช้งาน component directive ที่ชื่อ <staff-detail> รวมทั้งมีการ
เชื่อมโยงข้อมูลด้วย Input Output property
<staff-detail [staff]="currentStaff" (onDelete)="deleteStaff($event)">
  </staff-detail>
โดยชื่อเรียกแทนที่ชื่อ staff ที่กำหนดใน [staff] รับค่า currentStaff ที่เป็น property ของ AppComponent
ซึ่งถ้าเราดูใน AppComponent class จะเห็นว่า currentStaff เป็นฟังก์ชั่น แล้วทำไมเราถึงไม่เรียกใช้ค่าแบบ
กำหนดในลักษณะนี้ currentStaff() ทั้งนี้ก็เพราะ เราใช้คำสั่ง get ไว้ด้านหน้า ฟังก์ชั่นนี้จะคืนค่าออกมาทันที
เมื่อ component ถูกใช้งาน เราจึงสามารถใช้ค่า currentStaff แทนได้ และที่สำคัญอีกอย่างว่าทำไมเราไม่เรียก
ใช้งานแบบฟังก์ชั่น ทั้งนี้ก็เพราะว่า [staff] เป็น input property ค่าด้านขวาจะเป็นนิพจน์ของ template ไม่ใช้
คำสั่งของ template เหมือนกับการใช้งาน event property หรือ output property นั่นเอง
  get currentStaff():Staff{
    return new Staff(4,'Linda',34);
  }
และส่วนสุดท้ายส่วนของ output property เราใช้ (onDelete) เป็น event ให้การทำคำสั่งของ template ที่ชื่อ
deleteStaff() โดยส่ง $event object เข้าไปเป็น parameter และเราทราบดีว่า $event ก็คือ staff object
ที่เราส่งออกมา ในตัวอย่างเราทดสอบแสดงค่า $event ที่ส่งออกมา แล้วนำเข้าไปใช้งานในคำสั่ง deleteStaff()
ผ่านตัวแปร parameter ที่ชื่อ staff
  deleteStaff(staff:Staff){
    console.log(staff);
  }
เรามาลองทดสอบและดูผลลัพธ์กัน
ผลลัพธ์ที่ได้ เมื่อรัน App ขึ้นมาครั้งแรก
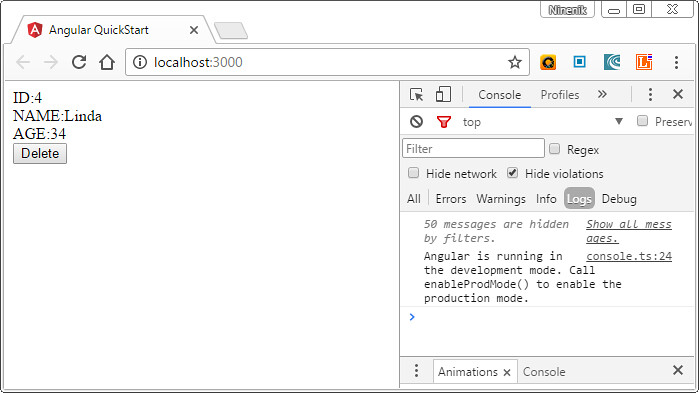
ข้อมูลของ staff คนปัจจุบันถูกส่งเข้าไปใน component directive ผ่าน [staff] input property
แล้วแสดงค่าดังรูปด้านบน
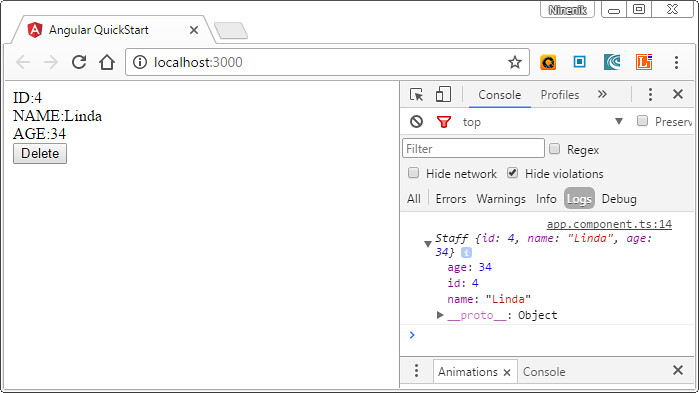
และเมื่อเรากดปุ่ม Delete ตัวปล่อย event ก็จะทำการปล่อย $event object ออกมาผ่าน (onDelete)
output property เมื่อเกิด event (onDelete) เกิดขึ้น ก็ไปทำคำสั่ง deleteStaff() ไปทำคำสั่ง
console.log() แสดง $event object ออกมา จะเห็นว่า $event object ที่ถูกปล่อยออกมาก็คือ staff object
ของ staff คนปัจจุบันนั่นเอง
เท่านี้เราก็สามารถนำความเข้าใจเกี่ยวกับการใช้งาน input output property ใน component directive
ไปประยุกต์ใช้งานต่อไปได้เลย
หัวข้อนี้ก็ขอจบเพียงเท่านี้ บทความตอนต่อไป จะเกี่ยวกับอะไรรอติดตาม
หมายเหตุ: อย่าลืมว่าทุกครั้งที่เรามีการสร้าง component class ขึ้นมาใหม่ เราต้องไปกำหนดในไฟล์
app.module.ts ก่อนใช้งาน ในตัวอย่างเราสร้าง StaffDetailComponent ขึ้นมา แต่ไม่ได้บอกวิธีการไป
กำหนดใน @NgModule ต่อๆ ไปจะข้ามส่วนนี้ไปเพื่อให้บทความมีความสั้นกระชับ ดังนั้นให้จำจุดนี้ไว้เสมอๆ
อีกกรณี ทำไมเราถึงไม่กำหนด [staff] กับ (onDelete) ไว้ในไฟล์ app.module.ts เหมือนตอนที่สร้าง
attribute directive ทั้งนี้ก็เพราะว่า input และ output ข้างต้นทั้งสอง เราใช้งานเฉพาะใน component directive
จึงไม่จำเป็นต้องไปกำหนดใน @NgModule นั้นเอง

