เนื้อหาในตอนที่ 6 นี้เราจะมาดูในเรื่องการใช้งาน Advance HttpClient ใน Anuglar ส่วนของ
การใช้งาน progress event กรณีที่ใช้งานร่วมกับการอัพโหลดไฟล์ที่มีขนาดใหญ่ และเราต้องการ
ที่จะแสดงสถานะหรือความคืบหน้าของการอัพโหลด เช่นว่า ขณะนี้อัพโหลดไปแล้วคิดเป็นกี่เปอร์เซ็น
เป็นต้น
ในตัวอย่างการประยุกต์และการใช้งานที่จะนำเสนอต่อไปนี้ จะมีด้วยกัน 2 รูปแบบ แบบแรกคือการเลือก
เฉพาะไฟล์สำหรับอัพโหลด โดยไม่มีการส่งข้อมูลใดๆ นอกจากไฟล์ที่ต้องการอัพโหลด และมีการใช้งาน
progress event หรือการใช้งาน event ที่แสดงถึงความคืบหน้าของอัพโหลดไฟล์ ส่วนแบบที่สองเราจะเป็น
การใช้งานกรณีส่งข้อมูลรูปภาพไปพร้อมกับข้อมูลของ element form อื่นเพิ่มเติมไปด้วย โดยในที่นี้เราจะ
ส่งข้อมูลจาก input text และก็ไฟล์อัพโหลดไปใช้งานพร้อมกัน โดยวิธีที่สองนี้จะไม่มีการใช้งาน progress event
สำหรับในตัวอย่าง เราจะใช้รูปแบบของ input file ของ bootstrap 4 โดยจะยกตัวอย่างเป็นการอัพโหลด
เป็นไฟล์รูปแบบ มีการแสดง preview รูปภาพที่กำลังจะอัพโหลดด้วย
การอัพโหลดไฟล์ร่วมกับ การใช้งาน Progress Event
เริ่มต้นกันที่ไฟล์ register.component.css กำหนด css class สำหรับใช้งานดังนี้
ไฟล์ register.component.css
1 2 3 | #place_previewImg{ margin-bottom: 10px;} |
ไฟล์ register.component.html
1 2 3 4 5 6 7 8 9 10 11 12 13 14 15 16 17 18 19 20 21 22 23 24 25 26 27 28 | <p> register works!</p><pre>{{ responseValue | json }}</pre><pre>{{ registForm.value | json }}</pre><form (ngSubmit)="onSubmit(registForm)" #registForm="ngForm" novalidate> <div class="form-group row"> <label for="file2" class="col-3 col-form-label text-right"> อัพโหลดไฟล์ </label> <div class="col-6"> <label class="custom-file"> <input (change)="onChangePic($event)" type="file" name="file2" id="file2" class="custom-file-input" accept="image/*"> <span class="custom-file-control">{{ chooseFile }}</span> </label> </div> <div class="offset-3"></div> </div> <div class="form-row"> <div class="col-9 offset-3"> <img id="place_previewImg" *ngIf="previewLoaded" [src]="previewImg" style="height:150px;"> </div> </div> <div class="form-row"> <div class="col-9 offset-3"> <button type="submit" [disabled]="!registForm.valid" class="btn btn-primary">สมัครสมาชิก</button> </div> </div> </form><br> |
ประยุกต์จากฟอร์มของบทความก่อนหน้า เราจะมีแค่ input type file สำหรับอัพโหลไฟล์รุปภาพ
1 | <input (change)="onChangePic($event)" type="file" name="file2" id="file2" class="custom-file-input" accept="image/*"> |
มีการกำหนด onChange event เข้าไปสำหรับทำการแสดงรูปภาพ preview ผ่านฟังก์ชั่น onChangePic($event)
โดยส่งค่า Event Object เข้าไปในฟังก์ชั่นด้วย เมื่อมีการเลือกไฟล์รูปภาพ ก็จะให้แสดงชื่อไฟล์รูปภาพผ่านตัวแปร
chooseFile
1 | <span class="custom-file-control">{{ chooseFile }}</span> |
และแสดงรูป prview ในส่วนของแท็ก img
1 | <img id="place_previewImg" *ngIf="previewLoaded" [src]="previewImg" style="height:150px;"> |
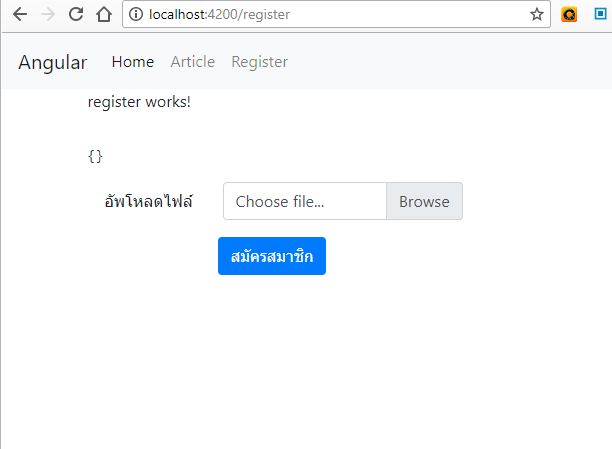
หน้าตาของส่วนของฟอร์มอัพโหลดไฟล์ จะได้เป็นดังนี้
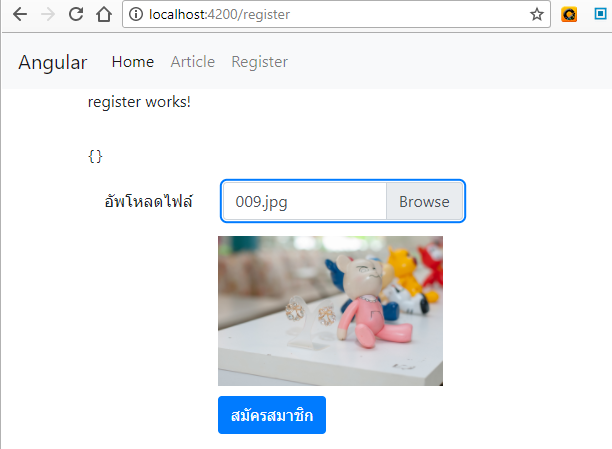
ตัวอย่างเมื่อเลือกไฟล์ (กรณีเพิ่มโค้ด javascript แล้ว)
ต่อไปดูในส่วนของไฟล์การทำงานเพื่อทำการอัพโหลดไฟล์ให้เราปรับไฟล์ register.component.ts เป็นดังนี้
ไฟล์ register.component.ts
1 2 3 4 5 6 7 8 9 10 11 12 13 14 15 16 17 18 19 20 21 22 23 24 25 26 27 28 29 30 31 32 33 34 35 36 37 38 39 40 41 42 43 44 45 46 47 48 49 50 51 52 53 54 55 56 57 58 59 60 61 62 63 64 65 66 67 68 69 70 71 72 73 74 75 76 77 78 79 80 81 82 83 84 85 86 87 88 89 90 91 92 93 94 95 96 97 98 99 100 | import { Component, OnInit } from '@angular/core';import { Router, ActivatedRoute, ParamMap } from '@angular/router';import { HttpClient, HttpHeaders, HttpErrorResponse, HttpRequest, HttpEventType, HttpResponse, HttpParams } from '@angular/common/http';import { Observable } from 'rxjs/Observable';import 'rxjs/add/operator/map';@Component({ // selector: 'app-register', templateUrl: './register.component.html', styleUrls: ['./register.component.css']})export class RegisterComponent implements OnInit { public provinces:string[] = ['กรุงเทพฯ','นนทบุรี']; public hobbies:string[] = ['ออกกำลังกาย','อ่านหนังสือ']; public responseValue:any; public chooseFile:string = ''; public previewImg:any; public previewLoaded:boolean = false; public fileList:any[]; public fileupload:any; constructor( private http:HttpClient, private route: ActivatedRoute, private router:Router ) { } onSubmit(f:any){ let data = f.value; // ในที่นี้ค่านี้ยังไม่ใช้ เพราะเราจะส่งแค่ไฟล์ไปอย่างเดียว let file:any = this.fileupload; // กำหนด file Object mี่จะทำการอัพโหลด const req = new HttpRequest('POST',this.urlApi+'show_data.php', file, { reportProgress: true, // กำหนด reportProgress เพื่อใ้ช้งาน prgress event }); this.http.request(req).subscribe(event => { // โดยรูปแบบการอัพโหลดด้วยวิธีนี้จะเป็นการส่งข้อมูลแบบ event stream // ที่เราสามารถดูความคืบหน้าการอัพโหลดได้ if (event.type === HttpEventType.UploadProgress) { // ขณะกำลังอัพโหลด // ทดสอบแสดงสถานะการอัพโหลดผ่่านทาง console const percentDone = Math.round(100 * event.loaded / event.total); console.log(`File is ${percentDone}% uploaded.`); } else if (event instanceof HttpResponse) { // แสดงสถานะอัพโหลดสำเร็จแล้วทาง console console.log('File is completely uploaded!'); this.fileupload = null; this.chooseFile = ''; this.previewLoaded = false; } }); // การตรวจสอบการเลือกไฟล์และแสดงชื่อไฟล์ onChangePic(e:any){ console.log(e); let file = e.dataTransfer ? e.dataTransfer.files[0] : e.target.files[0]; this.fileupload = file; this.fileList = e.target.files; console.log(file); console.log(typeof file); if(typeof(file)=='undefined'){ console.log("Please choose file"); this.chooseFile = ''; this.previewImg = ''; this.previewLoaded = false; }else{ this.chooseFile = file.name; this.previewThumbnail(file); } } // ส่วนของการแสดงรูป preview previewThumbnail(file:any){ let imageType = /image.*/ if(!file.type.match(imageType)){ alert('invalid format'); return; } let reader = new FileReader(); reader.onload = this._handleReaderLoaded.bind(this); reader.readAsDataURL(file); } // ส่วนของการส่ง dataUti ของรุปไปแสดงเป็น preview _handleReaderLoaded(e) { this.previewImg = e.target.result; this.previewLoaded = true; } ngOnInit() { }} |
คำอธิบายแสดงในโค้ด เรามีการกำหนด option ให้มีการใช้งาน progress event ผ่านการกำหนดค่า reportProgress: true
ผลลัพธ์ของการทำงานของโค้ดข้างต้นดังแสดงในรุปตัวด้านล่าง
ต่อไปส่วนของฝั่ง server หรือ backend service ที่เราทำการรับค่าและบันทึกไฟล์ที่ได้ทำการอัพโหลด
ในตัวอย่างเราส่งไปที่ไฟล์ show_data.php ให้เราปรับในส่วนของไฟล์นี้เป็นดังนี้
ไฟล์ show_data.php ไฟล์รับค่าฝั่ง server
1 2 3 4 5 6 7 8 9 10 11 12 13 14 15 16 17 18 19 20 21 22 23 24 25 26 27 28 29 30 31 32 33 34 35 36 37 38 39 40 41 42 | <?phpheader('Access-Control-Allow-Origin: *'); header('Access-Control-Allow-Headers: Content-Type,X-Custom-Header'); header('Content-type: application/json');$jsonData = array(); if($_SERVER['REQUEST_METHOD'] == "GET") { echo json_encode($jsonData);}elseif($_SERVER['REQUEST_METHOD'] == "OPTIONS"){ echo json_encode($jsonData);}elseif($_SERVER['REQUEST_METHOD'] == "POST"){ //$vars=parse_str($res,$post_vars); $headers = getallheaders(); $mime_types = array( 'png' => 'image/png', 'jpg' => 'image/jpeg', 'jpeg' => 'image/jpeg', 'jpg' => 'image/jpeg', 'gif' => 'image/gif', 'bmp' => 'image/bmp', 'ico' => 'image/vnd.microsoft.icon', 'tiff' => 'image/tiff', 'tif' => 'image/tiff', 'svg' => 'image/svg+xml', 'svgz' => 'image/svg+xml', ); $ext = array_search($headers['Content-Type'], $mime_types); $filename = time().".".$ext; file_put_contents("upload/".$filename,$uploadData); echo json_encode(array( "statusCode"=>"200 OK", "statusMessage"=>"Successful" )); }else{ header("HTTP/1.1 403 Access Forbidden"); echo json_encode(array( "statusCode"=>"403 Access Forbidden", "statusMessage"=>"Fail" ));}?> |
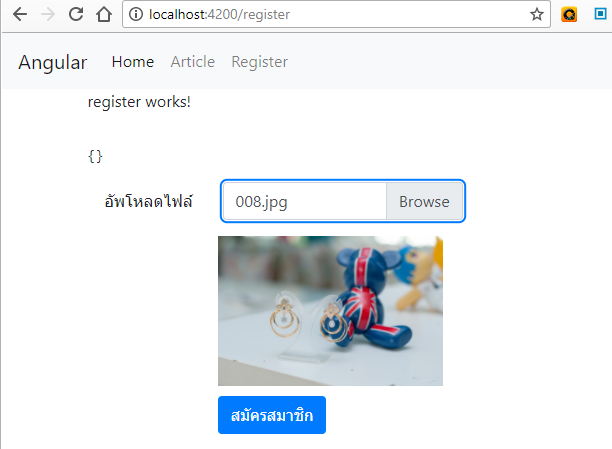
ทดสอบการทำงาน สังเกตจากรูปด้านล่าง เมื่อมีการอัพโหลดไฟล์เรียบร้อยแล้ว เราทำการล้างค่าข้อมูลเก่า
ในฟอร์มจะไม่มีการแสดงรุปภาพ preview แล้ว พร้อมสำหรับการอัพโหลดไฟล์ใหม่แล้ว ส่วนของ console
เราจะเห็นว่ามีการแสดง progress event ค่าเป็นเปอร์เซ็นต์การทำงานในตัวอย่างจะเห็นมี 72% แลถก็ 100%
เมื่อมีการอัพโหลดไฟล์สำเร็จ

ตัวอย่างไฟล์รุปภาพที่อัพโหลดสำเร็จแล้ว

เป็นอันเสร็จเรียบร้อยสำหรับแนวทางแรกที่มีการใช้งาน progress event
การอัพโหลดไฟล์พร้อมกับข้อมูลอื่นๆในฟอร์มด้วย FormData Object
ไปต่อที่รูปแบบที่สอง ที่มีการส่งรูปภาพไปพร้อมกับข้อมูลฟอร์มไปบันทึกพร้อมกัน ให้เราปรับไฟล์
register.component.html โดยเพิ่ม input type text เข้าไปดังนี้
ไฟล์ register.component.html
1 2 3 4 5 6 7 8 9 10 11 12 13 14 15 16 17 18 19 20 21 22 23 24 25 26 27 28 29 30 31 32 33 34 35 36 37 38 39 40 41 42 43 | <p> register works!</p><pre>{{ responseValue | json }}</pre><pre>{{ registForm.value | json }}</pre><form (ngSubmit)="onSubmit(registForm)" #registForm="ngForm" novalidate> <div class="form-group row"> <label for="fullname" class="col-3 col-form-label text-right"> ชื่อ นามสกุล </label> <div class="col-6"> <input type="text" class="form-control is-invalid" ngModel #fullname="ngModel" name="fullname" id="fullname" [class.is-valid]="fullname.valid" [class.is-invalid]="!fullname.valid" placeholder="Fullname" required> <div class="invalid-feedback"> Please provide a valid Fullname. </div> </div> <div class="offset-3"></div> </div> <div class="form-group row"> <label for="file2" class="col-3 col-form-label text-right"> อัพโหลดไฟล์ </label> <div class="col-6"> <label class="custom-file"> <input (change)="onChangePic($event)" type="file" name="file2" id="file2" class="custom-file-input" accept="image/*"> <span class="custom-file-control">{{ chooseFile }}</span> </label> </div> <div class="offset-3"></div> </div> <div class="form-row"> <div class="col-9 offset-3"> <img id="place_previewImg" *ngIf="previewLoaded" [src]="previewImg" style="height:150px;"> </div> </div> <div class="form-row"> <div class="col-9 offset-3"> <button type="submit" [disabled]="!registForm.valid" class="btn btn-primary">สมัครสมาชิก</button> </div> </div> </form><br> |
จากนั้นปรับโค้ดในส่วนของไฟล์ register.component.ts เป็นดังนี้
ไฟล์ register.component.ts
1 2 3 4 5 6 7 8 9 10 11 12 13 14 15 16 17 18 19 20 21 22 23 24 25 26 27 28 29 30 31 32 33 34 35 36 37 38 39 40 41 42 43 44 45 46 47 48 49 50 51 52 53 54 55 56 57 58 59 60 61 62 63 64 65 66 67 68 69 70 71 72 73 74 75 76 77 78 79 80 81 82 83 84 85 86 87 88 89 90 91 92 93 94 95 96 97 98 99 100 101 102 103 104 105 106 107 108 109 110 111 112 113 114 | import { Component, OnInit } from '@angular/core';import { Router, ActivatedRoute, ParamMap } from '@angular/router';import { HttpClient, HttpHeaders, HttpErrorResponse, HttpRequest, HttpEventType, HttpResponse, HttpParams } from '@angular/common/http';import { Observable } from 'rxjs/Observable';import 'rxjs/add/operator/map';@Component({ // selector: 'app-register', templateUrl: './register.component.html', styleUrls: ['./register.component.css']})export class RegisterComponent implements OnInit { public provinces:string[] = ['กรุงเทพฯ','นนทบุรี']; public hobbies:string[] = ['ออกกำลังกาย','อ่านหนังสือ']; public responseValue:any; public chooseFile:string = ''; public previewImg:any; public previewLoaded:boolean = false; public fileList:any[]; public fileupload:any; constructor( private http:HttpClient, private route: ActivatedRoute, private router:Router ) { } onSubmit(f:any){ let data = f.value; let file:any = this.fileupload; let formData:FormData = new FormData(); // กรณีมีการเลือกไฟล์ ส่งไฟล์ไปใช้งานกับ formData if(file && file!='undefined'){ console.log(file); formData.append('uploadFile', file, file.name); } // วนลูปค่าจาก form ที่ส่งเข้ามา ไปใช้งานใน formData for(let key in data ) { formData.append(key, data[key]); } this.http.post(this.urlApi+'show_data.php',formData,{ headers: new HttpHeaders().set('X-Custom-Header', 'my-header'), params: new HttpParams().set('id', '3') }) .subscribe(result =>{ this.responseValue = result; console.log(result); f.reset(); // reset form this.fileupload = null; this.chooseFile = ''; this.previewLoaded = false; }, ( err:HttpErrorResponse ) => { // กรณี error if (err.error instanceof Error) { // กรณี error ฝั่งผู้ใช้งาน หรือ การเชื่อมต่อเกิด error ขึ้น console.log('An error occurred:', err.error.message); }else{ // กรณี error ฝั่ง server ไม่พบไฟล์ ,server error console.log(`Backend returned code ${err.status}, body was: ${err.error}`); } }); } // การตรวจสอบการเลือกไฟล์และแสดงชื่อไฟล์ onChangePic(e:any){ console.log(e); let file = e.dataTransfer ? e.dataTransfer.files[0] : e.target.files[0]; this.fileupload = file; this.fileList = e.target.files; console.log(file); console.log(typeof file); if(typeof(file)=='undefined'){ console.log("Please choose file"); this.chooseFile = ''; this.previewImg = ''; this.previewLoaded = false; }else{ this.chooseFile = file.name; this.previewThumbnail(file); } } // ส่วนของการแสดงรูป preview previewThumbnail(file:any){ let imageType = /image.*/ if(!file.type.match(imageType)){ alert('invalid format'); return; } let reader = new FileReader(); reader.onload = this._handleReaderLoaded.bind(this); reader.readAsDataURL(file); } // ส่วนของการส่ง dataUti ของรุปไปแสดงเป็น preview _handleReaderLoaded(e) { this.previewImg = e.target.result; this.previewLoaded = true; } ngOnInit() { }} |
สำหรับการใช้งาน formData นั้นค่าที่ส่งไป จะเหมือนกับการส่งค่าปกติ ในตัวอย่างเราส่งข้อมูลแบบ POST เวลารับค่า
ในไฟล์ฝั่ง server เราก็รับค่าด้วยตัวแปร $_POST กรณีส่งค่าแบบ GET ก็รับค่าผ่านตัวแปร $_GET ส่วนถ้าเป็นไฟล์ส่งไป
ก็รับค่าผ่านตัวแปร $_FILSES เป็นรูปแบบการใช้งานปกติ ในที่นี้จะไม่ขอยกตัวอย่างโค้ดการอัพโหลดไฟล์ สามารถค้นหา
เพิ่มเดิมในเว็บไซต์ได้ จะแสดงแค่ค่าที่ถูกส่งไปดังนี้
ไฟล์ show_data.php
1 2 3 4 5 6 7 8 9 10 11 12 13 14 15 16 17 18 19 20 21 22 23 24 25 | <?phpheader('Access-Control-Allow-Origin: *'); header('Access-Control-Allow-Headers: Content-Type,X-Custom-Header'); header('Content-type: application/json');$jsonData = array(); if($_SERVER['REQUEST_METHOD'] == "GET") { echo json_encode($jsonData);}elseif($_SERVER['REQUEST_METHOD'] == "OPTIONS"){ echo json_encode($jsonData);}elseif($_SERVER['REQUEST_METHOD'] == "POST"){ echo json_encode(array( "statusCode"=>"200 OK", "statusMessage"=>"Successful", "getData"=>$_GET, "fileUpload"=>$_FILES, "postData"=>$_POST ));}else{ header("HTTP/1.1 403 Access Forbidden"); echo json_encode(array( "statusCode"=>"403 Access Forbidden", "statusMessage"=>"Fail" ));}?> |
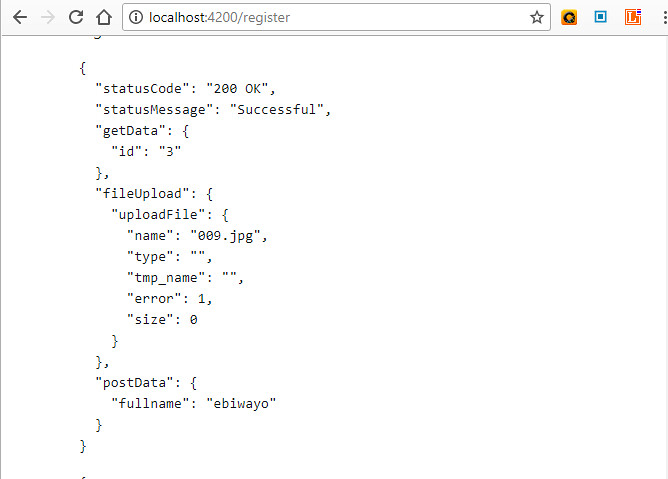
ทดสอบการทำงาน กรอกข้อมูล เลือกรูปภาพ จากนั้นกด submit
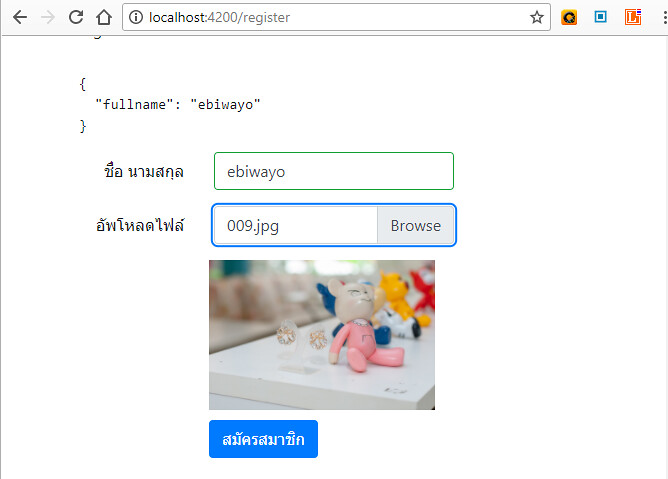
จะได้ค่าของข้อมูลที่ถูกส่งไปดังนี้
สามารถนำไปประยุกต์เพิ่มเติมได้ตามต้องการ
ตอนนี้เราได้ทำความเข้าใจในการรับส่งข้อมูลระหว่าง front-end และ backend ไปมากพอสมควรแล้ว เนื้อหาต่อไป
จะเป็นอะไร รอติดตาม

 อ่านต่อที่บทความ
 เนื้อหาที่เกี่ยวข้อง