ก่อนจะมาสู่ขั้นตอนนี้ได้ เราต้องเตรียมพร้อมตามขั้นตอนในหัวข้อต่อไปนี้ก่อน
เรียนรู้ phonegap สร้าง app ด้วย html,css และ javascript ตอนที่ 1
https://www.ninenik.com/content.php?arti_id=508 via @ninenik
เรียนรู้ phonegap ติดตั้ง node.js phonegap และ phonegap developer ตอนที่ 2
https://www.ninenik.com/content.php?arti_id=509 via @ninenik
ติดตั้ง git client บน windows สำหรับใช้งานกับ phonegap ตอนที่ 8
https://www.ninenik.com/content.php?arti_id=584 via @ninenik
แนะนำว่าควรมีมือถือ android สักเครื่องสำหรับทดสอบไฟล์ apk ที่เราสร้าง
เนื้อหาตอนนี้ ที่เราจะได้รู้ ก็คือ
1. การสร้าง app project คล้ายในตอนที่ 3 แต่จะละเอียดขึ้นมาหน่อย
phonegap สร้าง project แรก กับ HelloWorld ตอนที่ 3
https://www.ninenik.com/content.php?arti_id=510 via @ninenik
2. วิธีการเพิ่ม plugin สำหรับ Push Notifications โดยใช้
อันนี้ใครมีความรู้อยู่แล้ว ก็สะดวกศึกษาได้ด้วยตัวเองตามลิ้งค์ด้านบน
ก่อนเริ่ม ขออธิบาย เนื้อตอนนี้จะไม่เน้นยาว แต่มีภาคต่อ รายละเอียดข้อมูลที่นำมาประกอบ
จะได้จากเว็บไซต์ต่างๆ มีลิ้งค์ประกอบ และเนื่องจากผู้เขียนอธิบายตามที่ได้ลอง ไม่ได้เป็นกูรู
ด้านนี้ (คือหัดเชียนแล้วเอามาแชร์) ติดขัดส่วนใหนคงต้องไปค้นเพิ่มกันต่อเอง 555
เริ่มเลย
1. เปิด command prompt เปินไปได้เปิดแบบ administartor
ทดสอบเวอร์ชั่นปัจจุบันกันก่อน เผื่อใครได้ผลลัพธ์ต่าง ออกไปอาจจะเป็นเวอร์ชั่นของ
โปรแกรมที่ติดตั้ง อาจจะต่างกันไป
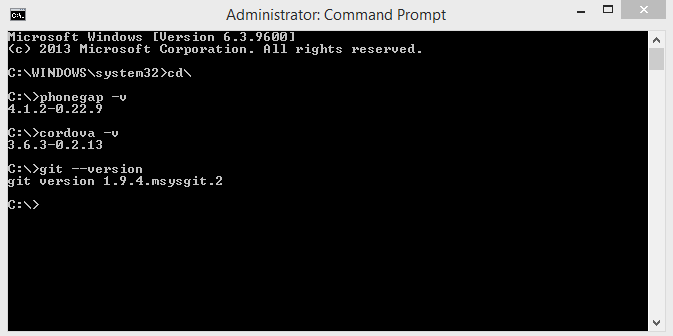
2. สร้างโฟลเดอร์ ชื่อ phonegap ไว้ที่ไดร์ C: (ถ้ามีหรือสร้างไว้แล้ว ก็ไม่ต้องสร้างใหม่)
C:\md phonegap   สร้างโฟลเดอร์ สำหรับทำงาน เกี่ยวกับ phonegap ในไดร์ C

C:\cd phonegap   เข้าไปในโฟลเดอร์
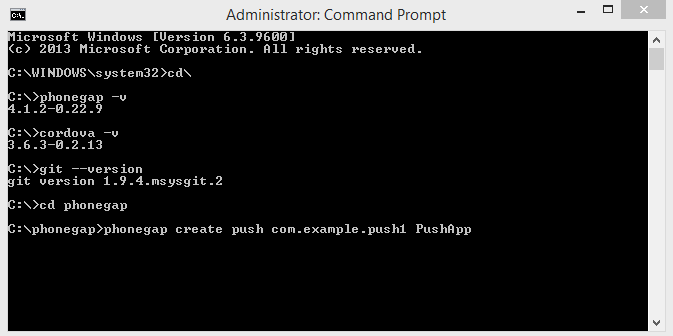
3. สร้าง project app ใช้รูปแบบ
phonegap create [ชื่อโฟลเดอร์] [app package ที่จะใช้] [ชื่อ app]
app package ที่จะใช้ ปกติจะไม่ให้ซ้ำ เพราะถ้าซ้ำเวลาติดตั้ง ก็จะไปทับตัวเดิม
แต่กรณีนี้เป็นชื่อทดสอบ ไม่ต้องสนใจอะไร ใครสนใจอ่านเพิ่มได้ที่
C:\phonegap>phonegap create push com.example.push1 PushApp

4. พอสร้างเสร็จจะได้โฟลเดอร์ และไฟล์ต่างตามรูป
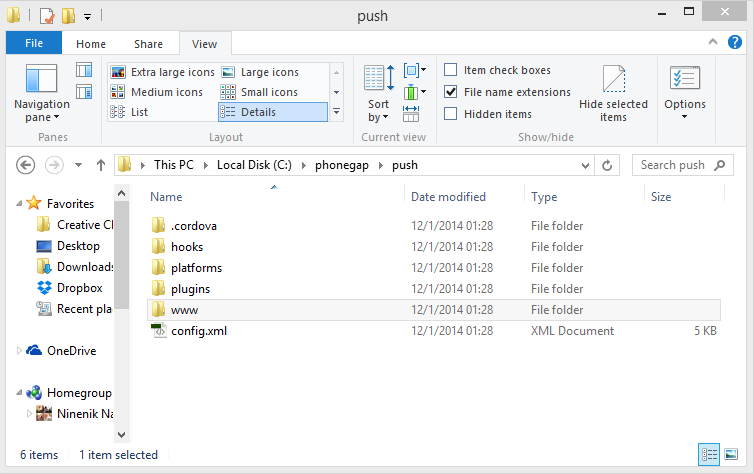
มารู้จัดโฟลเดอร์และไฟล์ต่างๆ เบื้องต้น เอาแค่ สีรายการนี้พอ
- plathforms สำหรับสร้างไฟล์ apk จะมีโฟลเดอร์ด้านในอีกที ของเราจะดูแค่ android
- plugins สำหรับดูว่า เราติดตั้ง plugin แล้วหรือไม่ ดูในโฟลเดอร์นี้
- www สำหรับสร้างไฟล์ html
config.xml สำหรับตั้งค่าหรือกำหนด ค่าของ plugin หรือกำหนด permission ส่วนอื่นๆ เพิ่มเติม
5. เข้าไปในโฟลเดอร์ push พร้อมใช้งานคำสั่งต่อไป
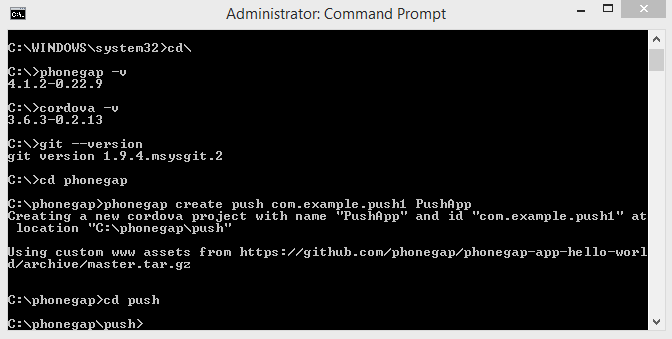
6. สร้างไฟล์ apk จาก app ต้วอย่างที่ให้มากันเลย เพือ่ดูว่าเราได้ ไฟล์ apk หรือไม่
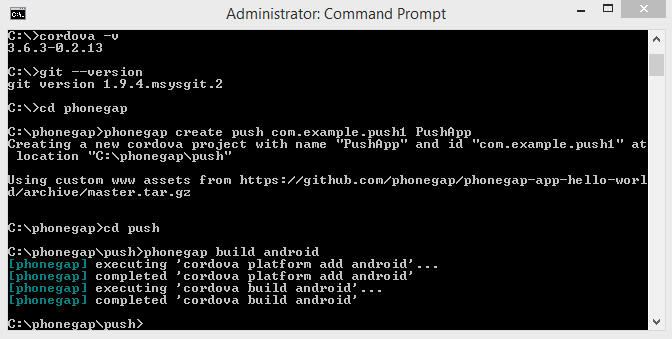
รอสักครู่จนการทำงานสิ้นสุด เราจได้ไฟล์ apk ตาม ตำแหน่งดังรูปด้านล่าง
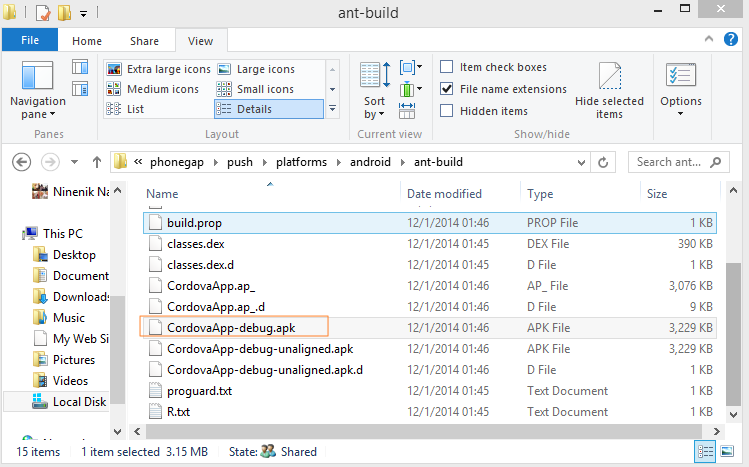
ไฟล์จะอยู่ที่ C:\phonegap\push\platforms\androidant-build
โดยชื่อไฟล์ อาจจะไม่เหมือนตามรูป ขึ้นกับเวอร์ชั่นของ phonegap หรือ cordova
แต่ถ้าได้ไฟล์ ตามรูปแบบ CordovaApp-debug.apk ถือว่าใช้ได้ (xxxxx-degug.apk)
ลองนำไฟล์ที่ได้ ไปติดตั้งลงเครื่องมือถือ android อย่าลืมอนุญาตให้สามารถติดตั้งไฟล์ apk
จากภายนอก ในมือถือด้วย
7. ต่อไปเราจะติดตั้ง push plugin
สามารถดูการติดตั้ง ลบ plugin ได้ด้วยตัวเองที่
โดย plugin ที่เราจะติดตั้ง คือ PushPlugin
สามารถใช้ทั้งคำสั่ง cordova หรือ phonegap ก็ได้ ในที่นี้เราจะใช้คำสั่ง cordova
cordova plugin add https://github.com/phonegap-build/PushPlugin.git
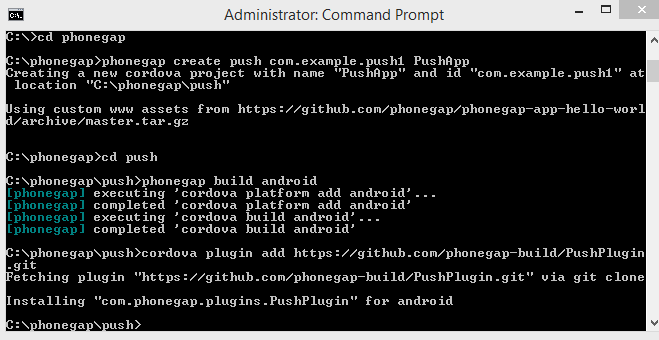
จะสังเกตเห็นว่าไฟล์ plugin นี้นามสกุล git นั่นคือเหตุผลทำไมเราถึงมีบทความ
ติดตั้ง git client บน windows สำหรับใช้งานกับ phonegap ตอนที่ 8
https://www.ninenik.com/content.php?arti_id=584 via @ninenik
พอติดตั้งเสร็จ เรามาเช็คว่าติดตั้งได้หรือไม่
ด้วยคำสั่ง
cordova plugin ls

หรือดูได้ที่โฟลเดอร์ plugin ตามรูป

ลืมไปว่า การใช้งาน push จำเป็นต้องใช้ข้อมูลเครื่องด้วย ดังนั้นเราต้องติดตั้ง plugin
อีกตัวเข้าไปด้วย คือ
cordova plugin add org.apache.cordova.device
ทำเหมือนเดิม

8. ต่อไปให้เพิ่มการตั้งค่านี้เข้าไปในไฟล์ config.xml
<gap:plugin name="com.phonegap.plugins.pushplugin" version="2.4.0" />

ใส่เวอร์ชั่นให้ตรงตาม plugin ที่เราติดตั้ง ดูเวอร์ชั่น ตอนลิสแสดงรายการตามรูปก่อนหน้าด้านบน
จะมีเวอร์ชั่นของ plugin กำกับ
9. ต่อไปมาสร้าง app ทดสอบ การใช้งาน push plugin
ให้เข้าไปในโฟลเดอร์ www ลบไฟล์ทั้งหมดทิ้ง เราจะสร้างไฟล์ทดสอบ
(ใครใช้ phonegap รุ่นเก่าบางรุ่น จะมีไฟล์ config.xml อยู่ด้วย ไม่ต้องลบ
หรือ ถ้าต้องการให้เหมือนตัวอย่าง ก็ให้ไปติดตั้ง phonegap เป็นเวอร์ชั่นใหม่)
ไว้ไฟล์เดียวชื่อ index.html
โค้ดที่ทดสอบนี้ เป็นโค้ดจากตัวอย่าง ยังไม่ต้องสนใจอะไร เราต้องการดูผลลัพธ์การทำงานเท่านั้น
<!DOCTYPE html>
<html lang="en">
<head>
    <meta charset="UTF-8">
    <meta http-equiv="X-UA-Compatible" content="IE=edge">
    <meta name="viewport" content="width=device-width, initial-scale=1">
    <title>Push</title>
    <link rel="stylesheet" href="https://maxcdn.bootstrapcdn.com/bootstrap/3.3.1/css/bootstrap.min.css">
</head>
<body>

<br><br>
<div class="container-fluid">

<pre>
    <div id="home">
        <div id="app-status-div">
            <ul id="app-status-ul">
                <li>Cordova PushNotification Plugin Demo</li>
            </ul>
        </div>
    </div>
</pre>

</div>

<script src="https://ajax.googleapis.com/ajax/libs/jquery/1.8.3/jquery.min.js"></script>
<script type="text/javascript" src="cordova.js"></script>
<script type="text/javascript">
$(function(){

});
</script>
<script type="text/javascript">
    var pushNotification;

    function onDeviceReady() {
        $("#app-status-ul").append('<li>deviceready event received</li>');

        document.addEventListener("backbutton", function(e){
            $("#app-status-ul").append('<li>backbutton event received</li>');
            if( $("#home").length > 0){
                // call this to get a new token each time. don't call it to reuse existing token.
                //pushNotification.unregister(successHandler, errorHandler);
                e.preventDefault();
                navigator.app.exitApp();
            }else{
                navigator.app.backHistory();
            }
        }, false);

        try{
            pushNotification = window.plugins.pushNotification;
            $("#app-status-ul").append('<li>registering ' + device.platform + '</li>');

            if(device.platform == 'android' || device.platform == 'Android' ||
                    device.platform == 'amazon-fireos' ) {
                    pushNotification.register(successHandler, errorHandler, {
                        "senderID":"661780372179",    // เปลี่ยนเป็นค่า project name จากตอนที่แล้ว
                        "ecb":"onNotification"
                    });		// required!
            }else{
                pushNotification.register(tokenHandler, errorHandler,{
                    "badge":"true",
                    "sound":"true",
                    "alert":"true",
                    "ecb":"onNotificationAPN"
                });	// required!
            }
        }catch(err){
            txt="There was an error on this page.\n\n";
            txt+="Error description: " + err.message + "\n\n";
            alert(txt);
        }
    }

    // handle GCM notifications for Android
    function onNotification(e) {
        $("#app-status-ul").append('<li>EVENT -> RECEIVED:' + e.event + '</li>');

        switch( e.event ){
            case 'registered':
                if( e.regid.length > 0 ){
                    $("#app-status-ul").append('<li>REGISTERED -> REGID:' + e.regid + "</li>");
                    // Your GCM push server needs to know the regID before it can push to this device
                    // here is where you might want to send it the regID for later use.
                    console.log("regID = " + e.regid);
                }
                break;
            case 'message':
                // if this flag is set, this notification happened while we were in the foreground.
                // you might want to play a sound to get the user's attention, throw up a dialog, etc.
                if (e.foreground){

                    $("#app-status-ul").append('<li>--INLINE NOTIFICATION--' + '</li>');

                }else{	// otherwise we were launched because the user touched a notification in the notification tray.

                    if(e.coldstart)
                        $("#app-status-ul").append('<li>--COLDSTART NOTIFICATION--' + '</li>');
                    else
                    $("#app-status-ul").append('<li>--BACKGROUND NOTIFICATION--' + '</li>');
                }

                $("#app-status-ul").append('<li>MESSAGE -> MSG: ' + e.payload.message + '</li>');
                //android only
                $("#app-status-ul").append('<li>MESSAGE -> MSGCNT: ' + e.payload.msgcnt + '</li>');
                //amazon-fireos only
                $("#app-status-ul").append('<li>MESSAGE -> TIMESTAMP: ' + e.payload.timeStamp + '</li>');
                break;
            case 'error':
                $("#app-status-ul").append('<li>ERROR -> MSG:' + e.msg + '</li>');
                break;
            default:
                $("#app-status-ul").append('<li>EVENT -> Unknown, an event was received and we do not know what it is</li>');
            break;
        }
    }

    function tokenHandler (result) {
        $("#app-status-ul").append('<li>token: '+ result +'</li>');
        // Your iOS push server needs to know the token before it can push to this device
        // here is where you might want to send it the token for later use.
    }

    function successHandler (result) {
        $("#app-status-ul").append('<li>success:'+ result +'</li>');
    }

    function errorHandler (error) {
        $("#app-status-ul").append('<li>error:'+ error +'</li>');
    }

    // ให้ไปทำงานฟังก์ชัน onDeviceReady เมือ cordova โหลดเรียบร้อยแล้ว
    document.addEventListener('deviceready', onDeviceReady, true);

 </script>
</body>
</html>
ในบรรทัด
"senderID":"661780372179", // เปลี่ยนเป็นค่า project name จากตอนที่แล้ว
Push Notifications ใน phonegap สมัครใช้งาน gcm ตอนที่ 9
https://www.ninenik.com/content.php?arti_id=585 via @ninenik
พอเสร็จแล้ว ให้เราสร้างเป็นไฟล์ apk แล้วนำ app ไปทดสอบได้เลย
หากไม่มีอะไรผิดผลาด app จะแสดงสถานถต่างๆ ของการใช้งาน push plugin
และจะมีค่าหนึ่ง ชื่อ REGID ค่านี้ จะใช้ในการส่งข้อความ push มายังเครื่องของเรา
ดูตัวอย่างรูปหน้าผลลัพธ์

ตอนหน้าเราจะ ทำฐานข้อมูลเก็บค่า REGID
และสร้าง ไฟล์ php ส่งค่ามาที่ app ที่เราเพิ่งสร้างขึ้น รอติดตาม

