เราได้เคยรู้จักวิธีการเพิ่มหน้า app ใน ionic material มาแล้วในบทความ
แนวทางการเพิ่มหน้า app และการจัด layout ใน ionic material
https://www.ninenik.com/content.php?arti_id=733 via @ninenik
โดยลักษณะการทำงานในการเชื่อมโยงไปแต่ละหน้านั้น จะเป็นการเชื่อมไปยัง state
ของแต่ละหน้า ซึ่งกรณีข้างต้น ถ้าเรามีหน้า app หลายๆ หน้าเราก็จะต้องเพิ่ม state
ของหน้านั้นๆ เพื่อให้สามารถเรียกใช้งานได้
แต่ในกรณีของบทความนี้ จะเป็นลักษณะการกำหนดหน้า app แบบไดนามิก โดยใช้
วิธีการส่งค่าไปยังหน้าที่ต้องการ และใช้ค่านั้นๆ เป็นตัวไปกำหนดว่า ข้อมูลที่ต้องการแสดง
เป็นข้อมูลชุดใด ทำความเข้าใจง่ายๆ เช่น เรามีหัวข้อข่าวๆ แสดงในหน้ารวม และพอกดเข้าไป
ดูรายละเอียด ของหัวข้อข่าว นั้นก็จะแสดงรายละเอียดของหัวข้อข่าวที่เรากดเลือกเข้ามา โดยใน
ขั้นตอนการเลือกหัวข้อข่าว ก็ส่งค่าไอดีของหัวข้อข่าวที่ต้องการแสดงมายังหน้าแสดงรายละเอียด
แล้วก็นำค่าไอดีนั้นไปดึงข้อมูลมาแสดง หรืออธิบายในรูปแบบของเว็บไซต์ ก็คือการส่งค่าไปกับ url
เช่น
รูปบบ url หน้าหลัก
www.example.com/content.php
รูปบบ url หน้ารายละเอียด
www.example.com/content_view.php?id=1
id คือตัวแปรที่ถูกส่งไปยังไฟล์ content_view.php
ดังนั้นรูปแบบในลักษณะนี้ เราจะกำหนด state ที่เกี่ยวข้องแค่สองตัว คือ state หน้ารวม
และ state หน้ารายละเอียด โดยรูปแบบที่เราจะยกมาเป็นตัวอย่าง จะสมมติเป็นหน้า notification
1. เพิ่มเมนู ไปยังหน้า notification
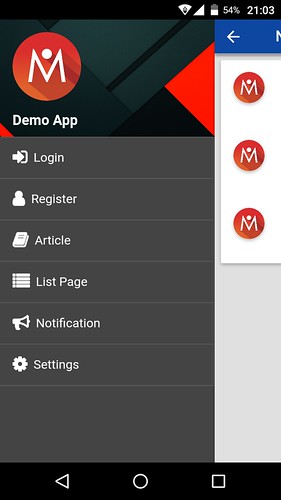
ทำการเพิ่มเมนู Notification เข้าไปใน side menu ด้านซ้าย
ในไฟล์ menu.html ในโฟลเดอร์ templates
<ion-item class="fs16 border-item-a fnormal" nav-clear menu-close ui-sref="app.notification">
    <i class="fa fa-bullhorn fa-lg" aria-hidden="true"></i>
    Notification
</ion-item>
ui-sref คือการกำหนดให้ลิ้งค์ไปยัง state ที่ชื่อ app.notification
2. สร้าง state สำหรับหน้า notification และหน้า notification detail
ให้เปิดไฟล์ app.js ในโฟลเดอร์ js ดูในส่วนของ method config() ทำการเพิ่ม state
ทั้งสองแทรกเข้าไป
    .state('app.notification', {// กำหนด state
        url: '/notification',  // กำหนดตำแหน่งหน้า app คล้ายๆ url ในเว็บ
        views: {
            'menuContent': { // ส่วนของการแสดงใน view ชื่อ menuContent
                templateUrl: 'templates/notification.html', //
                controller: 'NotificationCtrl'// กำหนดชื่อ controller ที่จะใช้งาน
            },
            'fabContent': { // ส่วนของการแสดงใน view ชื่อ fabContent ไม่ได้กำหนดอะไร
                template: ''
            }
        }
    })
    .state('app.notificationview', {// กำหนด state
        url: '/notification/:notifyid',  // กำหนดตำแหน่งหน้า app คล้ายๆ url ในเว็บ
        views: {
            'menuContent': { // ส่วนของการแสดงใน view ชื่อ menuContent
                templateUrl: 'templates/notify/notificationview.html', //
                controller: 'NotificationViewCtrl'// กำหนดชื่อ controller ที่จะใช้งาน
            },
            'fabContent': { // ส่วนของการแสดงใน view ชื่อ fabContent ไม่ได้กำหนดอะไร
                template: ''
            }
        }
    })
state แรกที่เราเพิ่มชื่อว่า app.notification
รูปแบบ url เป็น /notification
controller สำหรับจัดการชื่อ NotificationCtrl
ไช้ไฟล์ template ชื่อ notification.html อยู่ในโฟลเดอร์ templates
state ที่สองที่เราเพิ่มชื่อว่า app.notificationview
รูปแบบ url เป็น /notification/:notifyid
controller สำหรับจัดการชื่อ NotificationViewCtrl
ไช้ไฟล์ template ชื่อ notificationview.html อยู่ในโฟลเดอร์ templates > notify
สังเกตรูปแบบการกำหนด url ใน state ที่สองที่เราเพิ่ม จะเห็นว่ามีการเพิ่ม parameter คล้ายเป็นชื่อตัวแปรเข้าไปด้วย
โดยมีการเพิ่มเข้าไปแค่ 1 ตัว ชื่อว่า notifyid กำหนดโดยมีเครื่องหมาย colon : ด้านหน้า
กรณีเรากำหนดหลายๆ ค่า ให้ใช้รูปแบบนี้ /notification/:param1/:param2 แบบนี้ เป็นต้น
โดย parameter นี้เหมือนตัวแปรไว้รับค่าที่ส่งมากับ url หรือค่าที่ส่งจากหน้าอื่น
3. สร้างไฟล์ template สำหรับแสดงข้อมูลและส่งค่าข้อมูล
จากข้อ 2 เรามีการใช้งานไฟล์ template สองไฟล์ คือไฟล์หน้ารวม และไฟล์หน้ารายละเอียด
โดยใช้ชื่อว่า notification.html สร้างไว้ในโฟลเดอร์ templates
และ notificationview.html สร้างไว้ในโฟลเดอร์ templates > notify
ไฟล์ notification.html
<ion-view view-title="Notification">
    <ion-nav-buttons side="right">
        <div class="buttons buttons-right header-item">
    <span class="right-buttons">
    <button class="button button-icon button-clear ion-android-more-vertical"> </button>
    </span>
        </div>
    </ion-nav-buttons>
    <ion-content class="stable-bg" ng-class="{expanded:isExpanded}">


        <div class="list card">

            <div ng-repeat="notify in notifyItem" class="item item-avatar"
                 ng-click="gourl(notify.id);">
                <img src="img/logo.png">
                <h2>{{notify.topic}}</h2>
                <p>{{notify.daydate}}</p>
            </div>

        </div>

    </ion-content>
</ion-view>
คำสั่ง ng-repeat="notify in notifyItem" เป็นการวนลูปนำค่าตัวแปรใน controller ที่ชื่อ notifyItem มาใช้ผ่าน
ตัวแปรที่กำหนดชื่อเป็น notify ไว้อ้างอิง จากนั้นนำค่าแต่ละค่าไปแสดงในส่วนต่างๆ ในหน้ารวม
คำสั่ง ng-click="gourl(notify.id);" เป็นการให้ทำงานเมื่อคลิกแล้วไปเรียกใช้ฟังก์ชั่น gourl() โดยมีการ
ส่งค่า id ของหัวข้อการแจ้งเตือนเข้าไปด้วย
ไฟล์ notificationview.html
<ion-view view-title="Notification Detail">
    <ion-nav-buttons side="left">
        <div class="buttons buttons-left header-item">
    <span class="left-buttons">
    <button ui-sref="app.notification"
            class="button button-icon button-clear ion-android-arrow-back"> </button>
    </span>
        </div>
    </ion-nav-buttons>
    <ion-content class="stable-bg" ng-class="{expanded:isExpanded}">

        <div class="list card">

            <div class="item item-avatar">
                <img src="img/logo.png">
                <h2>{{notifyTopic}}</h2>
                <p>{{notifyDayDate}}</p>
            </div>

            <div class="item item-body">
                <img class="full-image" src="{{notifyImg}}">
                <p>
                    {{notifyDetail}}
                </p>
            </div>

        </div>


    </ion-content>
</ion-view>
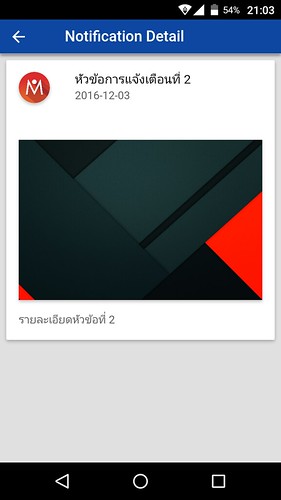
สำหรับในหน้า notificationview.html จะเป็นการนำข้อมูลรายละเอียดของหัวข้อแจ้งเตือนนั้นๆ
มาแสดง โดยเป็นเพียงการนำค่าตัวแปรข้อมูลมาแสดงตามส่วนต่างๆ เท่านั้น ค่าตัวแปรจะกำหนด
ในส่วนของ controller ของหน้ารายละเอียด
สังเกตว่าในหน้ารายละเอียด ตรงปุ่ม back เราจะกำหนดให้คลิกแล้วกลับมายังหน้ารวมอีกครั้ง
4. เพิ่มฟังก์ชั่น getNotify ใน service เพื่อแสดงรายการแจ้งเตือน
ในไฟล์ services.js ในโฟลเดอร์ js เราจะทำการเพิ่มฟังก์ชั่น ที่ขื่อว่า getNotify(id) โดยมีการ
รับค่า id มาด้วย โดยฟังก์ชั่นนี้เราจะเพิ่มเข้าไปใน service ที่เราเคยทำไว้แล้วที่ชื่อ notifyService
.service('notifyService',function($http, $q){ // สร้าง service
    // กำหนด url ของ ไฟล์ api ของเรา
    var url = "http://192.168.8.100/app/api/notify_api.php";
    return { // ในที่นี้เราจะใช้การส่งค่าแบบ post
        setNotify: function(dataSend) {
            var deferred = $q.defer();
            $http.post(url,dataSend)
                .success(deferred.resolve)
                .error(deferred.reject);
            return deferred.promise;
        },
        updateNotify: function(dataSend) {
            var deferred = $q.defer();
            $http.post(url,dataSend)
                .success(deferred.resolve)
                .error(deferred.reject);
            return deferred.promise;
        },
        getNotify:function(id){
            var notifyItem;
            notifyItem = [
                {
                    id:1,
                    topic:'หัวข้อการแจ้งเตือนที่ 1',
                    detail:'รายละเอียดหัวข้อที่ 1',
                    daydate:'2016-12-03',
                    img:'img/material-graphite.jpg'
                },
                {
                    id:2,
                    topic:'หัวข้อการแจ้งเตือนที่ 2',
                    detail:'รายละเอียดหัวข้อที่ 2',
                    daydate:'2016-12-03',
                    img:'img/material-graphite.jpg'
                },
                {
                    id:3,
                    topic:'หัวข้อการแจ้งเตือนที่ 3',
                    detail:'รายละเอียดหัวข้อที่ 3',
                    daydate:'2016-12-03',
                    img:'img/material-graphite.jpg'
                }
            ];
            if(id){
                return notifyItem[id-1];
            }else{
                return notifyItem;
            }
        }
    };

})
สังเกตว่าเราจะใช้ข้อมูลสมมติ โดยกำหนดในรูปแบบ array ของ object ข้อมูลเพียง สามรายการ
เวลาประยุกต์ใช้ สามารถดัดแปลงเป็นการดึงข้อมูลจาก server ได้
ในส่วนท้ายของ notifyService เราจะเห็นการกำหนดเงื่อนไขการคืนค่ากลับออกมา
คือถ้าตอนเรียกใช้ฟังก์ชั่น มีการส่งค่า id มาด้วย ในตัวอย่าง เราจะให้คืนค่าเฉพาะ array ของ
object ที่มี array key นั้นๆ เนื่ยงจาก key array ของ javascript จะเริ่มจาก 0
ดังนั้นถัาส่ง 1 มา ซึ่งหมายถึงข้อมูลชุดแรก ก็จะต้องเป็น key ที่ 0 ดังนั้นเราจึงปรับให้ key -1
จะได้เป็น return notifyItem[id-1];
แต่กรณี้ที่ไม่มีการส่ง id มา ซึ่งเราจะใช้ในหน้ารวม ก็ให้คืนค่า array รายการ object ทั้งหมด
จะได้เป็น return notifyItem;
5. สร้าง controller สำหรับควบคุมการทำงานในหน้าที่เพิ่มเข้ามา
ในที่นี้เราสร้าง controller มาสองอัน ในไฟล์ controllers.js ในโฟลเดอร์ js
คำอธิบายแสดงในโค้ด
.controller('NotificationCtrl', function(
    $scope, $stateParams, $timeout, ionicMaterialInk, ionicMaterialMotion
    ,$ionicPlatform, $state, notifyService) {
    $scope.$parent.showHeader();
    $scope.$parent.clearFabs();
    $scope.$parent.setHeaderFab(false);
    $scope.$parent.hasShadow();

    $timeout(function() {
        $scope.isExpanded = false;
        $scope.$parent.setExpanded(false);
    }, 300);

    // สร้างตัวแปร notifyItem เรียกใช้ฟังก์ชั่น getNotify ของ notifyService
    // ได้รายการแจ้งเตือนทั้งหด
    $scope.notifyItem = notifyService.getNotify();

    // สร้างฟังก์ชั่นสำหรับ ลิ้งค์ไปหน้าที่ต้องการพร้อมส่งค่าไปด้วย
    $scope.gourl = function(val){
        // ลิ้งค์ไป state รายละเอียด โดยส่งตัวแปร notifyid ไปด้วย
        $state.go('app.notificationview', {notifyid : val});
    };

    ionicMaterialMotion.fadeSlideInRight();

    ionicMaterialInk.displayEffect();

})

.controller('NotificationViewCtrl', function(
    $scope, $stateParams, $timeout, ionicMaterialInk, ionicMaterialMotion
    ,$ionicPlatform, $state, $templateCache, notifyService) {
    $scope.$parent.showHeader();
    $scope.$parent.clearFabs();
    $scope.$parent.setHeaderFab(false);
    $scope.$parent.hasShadow();

    $timeout(function() {
        $scope.isExpanded = false;
        $scope.$parent.setExpanded(false);
    }, 300);

    // ทดสอบแสดงค่าที่ส่งมาผ่าน $stateParams
 //   alert($stateParams.notifyid);
    // เก็บค่าตัวแปรที่ส่งมาไว้ในตัวแปร เพื่อเรียกใช้งาน
    var notifyid = $stateParams.notifyid;
    // เรียกใช้ฟังก์ชั่น getNotify ของ notifyService โดยส่งค่าไปด้วย
    // เมื่อได้ค่าที่ต้องการแล้วให้นำมาไว้ในตัวแปร notifyItem
    var notifyItem = notifyService.getNotify(notifyid);

    // นำค่าที่ได้มากำหนดในตัวแปร เพื่อแสดงในหน้ารายละเอียด
    $scope.notifyTopic = notifyItem.topic;
    $scope.notifyDayDate = notifyItem.daydate;
    $scope.notifyImg = notifyItem.img;
    $scope.notifyDetail = notifyItem.detail;

//    console.log(notifyItem);
// ในบางครั้งเวลาเราแก้ไขไฟล์ template แล้วทดสอบผ่าน บราวเซอร์
// อาจจะเจอปัญหาหน้าเไฟล์ template ไม่อัพเดท สามารถใช้ templateCache จัดการ
 // ปัญหานี้ได้ด้วยคำสั่งด้านล่าง
//    $templateCache.removeAll();

    ionicMaterialMotion.fadeSlideInRight();

    ionicMaterialInk.displayEffect();

})
ใน NotificationCtrl เราจะเห็นการใช้งานคำสั่ง
$state.go('app.notificationview', {notifyid : val});
เป็นการลิ้งค์ไปยังหน้า state app.notificationview โดยส่งค่าตัวแปรชื่อ notifyid ไปด้วย
โดยมีค่าเท่ากับตัวแปร val ที่ส่งเข้ามาในฟังก์ชั่น กรณีส่งหลายๆ ค่าสามารถกำหนดในรูปแบบนี้
$state.go('app.notificationview', {param1:val1,param2:val2});
สำหรับในส่วน NotificationViewCtrl จะเป็นหน้ารับค่า มีการเรียกใช้งาน $stateParams เพื่อเป็นตัว
ดึงค่าของตัวแปรที่ส่งมา ตามรูปแบบ
$stateParams.notifyid;
6. ทำการ build apk ไฟล์แล้วนำไปทดสอบติดตั้งบนมือถือ
ด้วยคำสั่ง
C:\phonegap\learn005>phonegap build android
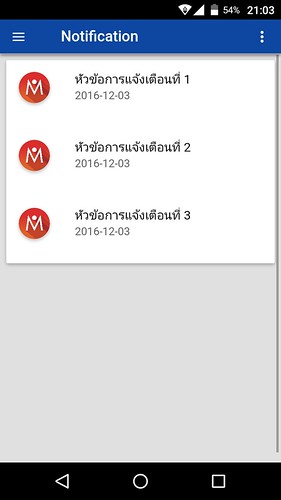
ให้ทำการทดสอบติดตั้งในมือถือ android ของเรา จะได้หน้าตา app ประมาณนี้


