
เนื้อหาต่อไปนี้ จะเป็นแนวทางการใช้งานตาราง table แบบ responsive โดยจะเริ่มทำความเข้าใจตั้งแต่ เหตุผล
เงื่อนไข และรูปแบบการใช้งาน นอกจากนั้น จะเพิ่มเนื้อหาเกี่ยวกับการใช้งาน checkbox แบบ button รวมถึงการ
ใช้งานปุ่ม ยืนย้นการลบข้อมูล ที่เรามักพักบ่อยในรายการข้อมูลในตาราง เพื่อให้ผู่ใช้งานลบรายการข้อมูลที่ต้องการ
การใช้งาน Table แบบ Responsive
หัวข้อนี้ เราจะมาดูตัวอย่างผลลัพธ์ของกรณีใช้งานการแสดงตารางแบบ responsive และแบบไม่ใช้งาน ดูโค้ด
ตัวอย่างสำหรับแสดงตารางเบื้องต้นดังนี้
<div class="row bg-light py-3">
	<div class="col text-center">
    Content Test
    </div>
</div>
<table class="table table-sm table-hover">
  <thead>
    <tr>
      <th scope="col">#</th>
      <th scope="col">Col 1</th>
      <th scope="col">Col 2</th>
      <th scope="col">Col 3 ยาวกว่าปกติ</th>
      <th scope="col">Col 4</th>
      <th scope="col">Col 5</th>
    </tr>
  </thead>
  <tbody>
  <?php
  	for($i=1;$i<=5;$i++){
  ?>
    <tr>
      <th scope="row"><?=$i?></th>
      <td>ข้อมูลคอลัมน์ 1</td>
      <td>ข้อมูลคอลัมน์ 2 </td>
      <td>ข้อมูลคอลัมน์ 3 ยาวกว่าปกติ</td>
      <td>ข้อมูล 4</td>
      <td>ข้อมูลคอลัมน์ 5 </td>
    </tr>
<?php
	}
?>
  </tbody>
</table>
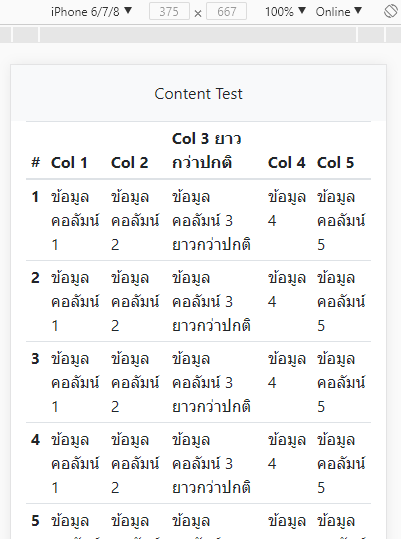
ตัวอย่างโค้ด เราสมมติรายการโดยการวนลูปมาแสดง 5 บรรทัด มีคอลัมน์ข้อมูล 5 คอลัมน์ ซึ่งปกติแล้ว
ถ้าเรามีการใช้งานตารางใน bootstrap โดยไม่ได้กำหนดความกว้างของคอลัมน์ ตัวตารางจะทำการปรับขนาด
ของตารางให้อยู่ในหน้าจออัตโนมัติ ทั้งหัวข้อในคอลัมน์ และรายการข้อมูล จะถูกตัดให้ขึ้นบรรทัดใหม่ ยกเว้นว่า
ข้อมูลนั้นๆ มีการกำหนดขนาดหรือความกว้างไว้ จะไม่มีการตัดขึ้นบรรทัดใหม่ ดูรูปตัวอย่างด้านล่างประกอบ
กรณีข้อมูลตัดขึ้นบรรทัดใหม่
แต่ถ้าหากว่า เราไม่ต้องการให้ข้อมูล มีการตัดขึ้นบรรทัดใหม่อัตโนมัติ หรือคอลัมน์มีการกำหนดความกว้างไว้
ด้วย width ในที่นี้ยกตัวอย่าง เราไม่ต้องการให้รายการขึ้นบรรทัดใหม่ โดยใช้ class "text-nowrap" เพื่มเข้าไป
ในคอลัมน์ข้อมูล ดังนี้
<div class="row bg-light py-3">
	<div class="col text-center">
    Content Test
    </div>
</div>
<table class="table table-sm table-hover">
  <thead>
    <tr>
      <th scope="col">#</th>
      <th scope="col">Col 1</th>
      <th scope="col">Col 2</th>
      <th scope="col" class="text-nowrap">Col 3 ยาวกว่าปกติ</th>
      <th scope="col">Col 4</th>
      <th scope="col">Col 5</th>
    </tr>
  </thead>
  <tbody>
  <?php
  	for($i=1;$i<=5;$i++){
  ?>
    <tr>
      <th scope="row"><?=$i?></th>
      <td class="text-nowrap">ข้อมูลคอลัมน์ 1</td>
      <td class="text-nowrap">ข้อมูลคอลัมน์ 2 </td>
      <td class="text-nowrap">ข้อมูลคอลัมน์ 3 ยาวกว่าปกติ</td>
      <td class="text-nowrap">ข้อมูล 4</td>
      <td class="text-nowrap">ข้อมูลคอลัมน์ 5 </td>
    </tr>
<?php
	}
?>
  </tbody>
</table>
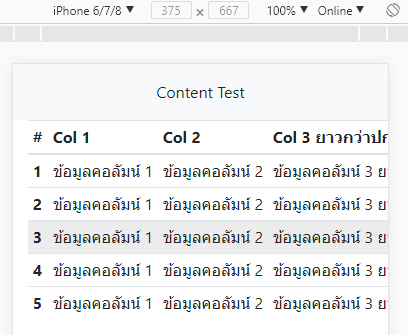
รูปดังผลลัพธ์ข้างต้นจะเห็นว่า เมื่อเรากำหนด class "text-nowrap" เข้าไปใน <td> หรือ <th> ของข้อมูล
ทำให้ไม่มีการตัดข้อความลง ตารางจึงยืดออกในแนวนอน และข้อมูลถูกซ่อนไปโดยมี scrollbar ในแนวนอน
ดูรูปด้านล่าง กรณีเราเลื่อน scrollbar ไปด้านซ้าย
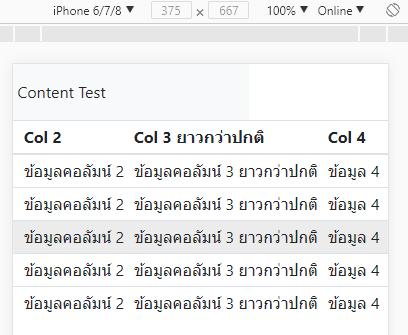
จะเห็นว่า ส่วนของเนื้อหา <div> ด้านบนที่เราทำไว้เพื่อทดสอบตรงข้อความ Content Test จะออกนอกขอบเขต
หน้าจอแสดงผล เกิดช่องว่างขึ้นด้านขวา ซึ่งเป็นสิ่งที่เราไม่ต้องการ เราต้องการให้ table responsive โดยสามารถ
เลื่อนดูข้อมูลตารางในแนวนอน โดยที่ส่วนอื่นไม่ขยับไปด้วย
วิธีการแก้ปัญหาคือ ให้เราทำการกำหนด <div> ที่มี class "table-responsive" คลุมส่วนของตาราง ดังนี้
<div class="row bg-light py-3">
	<div class="col text-center">
    Content Test
    </div>
</div>
<div class="table-responsive">
<table class="table table-sm table-hover">
  <thead>
    <tr>
      <th scope="col">#</th>
      <th scope="col">Col 1</th>
      <th scope="col">Col 2</th>
      <th scope="col" class="text-nowrap">Col 3 ยาวกว่าปกติ</th>
      <th scope="col">Col 4</th>
      <th scope="col">Col 5</th>
    </tr>
  </thead>
  <tbody>
  <?php
  	for($i=1;$i<=5;$i++){
  ?>
    <tr>
      <th scope="row"><?=$i?></th>
      <td class="text-nowrap">ข้อมูลคอลัมน์ 1</td>
      <td class="text-nowrap">ข้อมูลคอลัมน์ 2 </td>
      <td class="text-nowrap">ข้อมูลคอลัมน์ 3 ยาวกว่าปกติ</td>
      <td class="text-nowrap">ข้อมูล 4</td>
      <td class="text-nowrap">ข้อมูลคอลัมน์ 5 </td>
    </tr>
<?php
	}
?>
  </tbody>
</table>
</div>
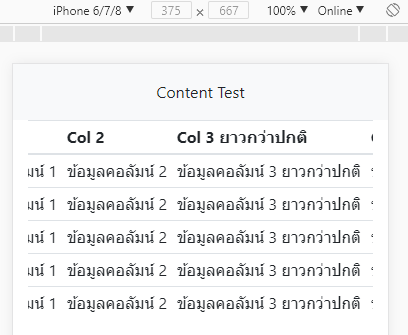
จะเห็นว่า เมื่อเราคลุมส่วนของตารางด้วย <div class="table-responsive"></div> เข้าไปแล้ว ถ้ามีการ
เลื่อนรายการตารางไปในแนวนอน ส่วนของ content text ไม่มีการเลื่อนตาม เกิด scrollbar เฉพาะในส่วน
ของตารางเท่านั้น
การใช้งาน "table-responsive" class จะทำให้ที่ขนาดหน้าจอใดๆ ถ้าหากว่าความกว้างหน้าจอนั้นๆ เกิดการซ่อน
ของรายการในตารางขึ้น หรือก็คือหน้าจอนั้น กว้างน้อยกว่าความกว้างของตารางที่จะแสดงได้ ตัวตารางก็จะแสดง
แบบ responsive ทันที
อย่างไรก็ตามเราสามารถกำหนด Breakpoint สำหรับใช้งาน table-responsive แบบเจาะจง ได้ในรูปแบบดังนี้
.table-responsive{-sm|-md|-lg|-xl}
ตัวอย่างเช่น
<div class="table-responsive-sm">
	<table>....</table>
</div>
การใช้งานแบบระบุเจาะจง breakpoint ข้างต้น คือ ที่ขนาดหน้าจอ breakpoint ขึ้นไป ไม่ต้องใช้งาน table-responsive
อย่างสมมติที่ sm (576px) ก็คือ ถ้าหน้าจอมีขนาดตั้งแต่ 576px เป็นต้นไป ไม่ต้องใช้งาน table-responsive ให้แสดง
ตารางแบบปกติ
การยืนยันการลบข้อมูลในตาราง
หัวข้อนี้ จะเป็นแนวทางการแสดงข้อความยืนยัน ก่อนทำการลบข้อมูลในตาราง ซึ่งจริงๆ แล้วเราสามารถหา plugin
เกี่ยวกับการ alert สวยๆ มาใช้งานได้ แต่ในที่นี้เราจะใช้ confirm() ฟังก์ชั่น ซึ่งใช้งานง่ายและสะดวก เราจะสมมมติ
array ของรายการข้อมูล จากนั้นทำการวนลูปแสดงรายการ เพิ่มคอลัมน์จัดการ ที่มีปุ่ม ลบข้อมูล โดยในปุ่มลบข้อมูล
เรากำหนด class ชื่อ "btn-confirm" เป็น ชื่อที่เรากำหนดขึ้นมาเอง จะใช้ชื่ออื่นก็ได้ ซึ่งเราจะใช้ชื่อนี้อ้างอิงตอน
เรียกใช้งาน นอกจากนั้น ในปุ่ม เราสามารถที่กำหนด title เพื่อบอกว่าปุ่มนี้ใช้ทำอะไร ในที่นี้เรากำหนดเป็น
title="ลบรายการข้อมูล" ซึ่งถ้าไม่กำหนด ค่าที่จะไปแสดงใน confirm ก็จะเป็นค่าเริ่มต้นที่เรากำหนด
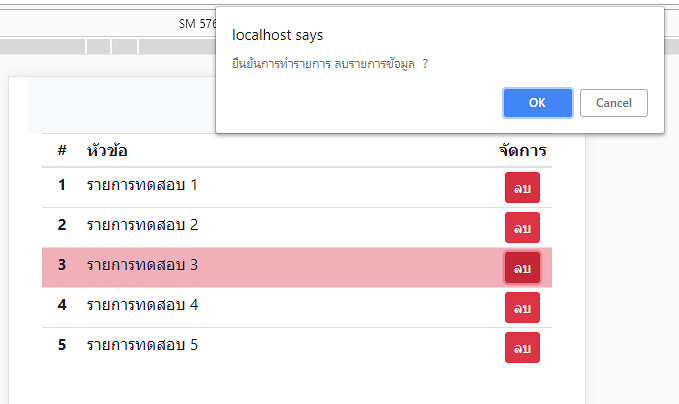
รูปแบบการทำงานของเราก็คือ เมื่อผู้ใช้กดปุ่ม ลบ ข้อมูล ก็ให้ขึ้นยืนยัน ว่าต้องการลบข้อมูลนี้จริงหรือไม่ และให้ทำ
การ highlight แถวของรายการที่กำลังจะลบ เพื่อแจ้งเตือนว่าเป็นแถวรายการที่ต้องการลบจริงหรือไม่ ดูโค้ดตัวอย่าง
ทั้งหมดด้านล่าง (สามารถดูตัวอย่าง ที่ DEMO 1 ท้ายบทความ)
demo.php
<!doctype html>
<html>
<head>
    <meta charset="utf-8">
    <meta name="viewport" content="width=device-width, initial-scale=1, shrink-to-fit=no">
    <title>Document</title>
    <link rel="stylesheet" href="https://unpkg.com/[email protected]/dist/css/bootstrap.min.css" >
</head>
<body>

<?php
$arr_simple_data = array(
	array("id"=>1,"title"=>"รายการทดสอบ 1"),
	array("id"=>2,"title"=>"รายการทดสอบ 2"),
	array("id"=>3,"title"=>"รายการทดสอบ 3"),
	array("id"=>4,"title"=>"รายการทดสอบ 4"),
	array("id"=>5,"title"=>"รายการทดสอบ 5"),
);
?>
<div class="container mb-2">
<div class="row bg-light py-3">
	<div class="col text-center">
    Content Test
    </div>
</div>
<div class="table-responsive-sm">
<table class="table table-sm table-hover">
  <thead>
    <tr>
      <th scope="col" class="text-center">#</th>
      <th scope="col">หัวข้อ</th>
      <th scope="col" class="text-center">จัดการ</th>
    </tr>
  </thead>
  <tbody>
  <?php
  	foreach($arr_simple_data as $row){
  ?>
    <tr class="">
      <th scope="row" class="text-center" width="40"><?=$row['id']?></th>
      <td class="text-nowrap">
      	<?=$row['title']?>
      </td>
      <td class="text-nowrap text-center" width="40">
			<a href="?d_item_id=<?=$row['id']?>" title="ลบรายการข้อมูล" class="btn btn-sm btn-danger btn-confirm">ลบ</a>
      </td>
    </tr>
<?php
	}
?>
  </tbody>
</table>
</div>

</div>


<script src="https://unpkg.com/[email protected]/dist/jquery.min.js"></script>
<script src="https://unpkg.com/[email protected]/dist/js/bootstrap.min.js"></script>
<script type="text/javascript">
$(function(){

	 $(".btn-confirm").on("click",function(){
	 	var obj = $(this); // อ้างอิงปุ่ม
	 	obj.parents("tr").toggleClass("table-danger"); // เปลี่ยนสีพื้นหลังแถวที่จะลบ
		// ถ้ามีการกำหนด title ใช้ข้อความใน title มาข้นแจ้ง ถ้าไม่มีใช้ค่าที่กำหนด "ลบรายการข้อมูล"
		 var alertMsg = (obj.attr("title")!=undefined)?obj.attr("title"):"ลบรายการข้อมูล";
		 setTimeout(function(){ // หน่วงเวลาเพื่อให้ การกำหนดสีพืนหลังแถวทำงานได้
			 if(!confirm("ยืนยันการทำรายการ "+alertMsg+" ?")){
				 	obj.parents("tr").toggleClass("table-danger"); // ไม่ยืนยันการลบ เปลี่ยนสีพื้นหลังกลับ
			 }else{
					window.location = obj.attr("href"); // ถ้ายืนยันการลบ ก็ให้ลิ้งค์ทำงาน
			 }
		 },100); // หน่วงเวลา 100 มิลลิวินาที
		 return false; // ไม่ให้ลิ้งค์ทำงานปกติ ให้เข้าไปในเงื่อนไข confirm แทน
	 });

});
</script>
</body>
</html>
รูปแบบการเรียกใช้งานในส่วนของ javascript ข้างต้น เราสามารถสร้างไว้ใน include ไฟล์ แล้วนำไปใช้ในหน้าต่างๆ
ที่มีการลบรายการข้อมูลในแถวได้ ทันที เพียงแค่กำหนด class "btn-confirm" ให้กับปุ่มลบข้อมูล และกำหนด title
ว่าต้องการแจ้งการยืนยันการทำรายการอะไร เมื่อมีการคลิกที่ปุ่มลิ้งค์นั้นๆ ก็จะขึ้นแจ้งให้ยืนยันการทำรายการ
การใช้งาน Checkbox Button เพื่ออัพเดทสถานะ
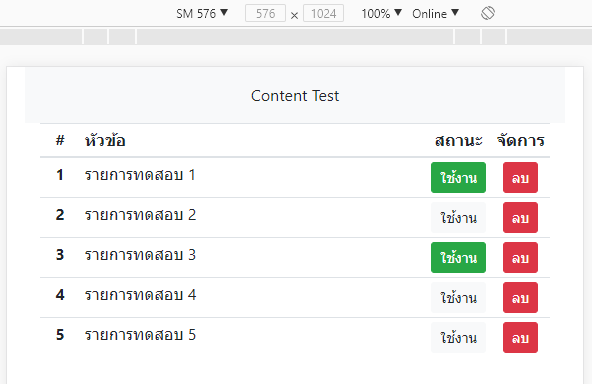
อีกรูปแบบการใช้งานในตารางที่เรามักพบก็คือ การปิดเปิดสถานะใดๆ ของรายการข้อมูล ทั้งนี้เพราะ การเพิ่ม
checkbox เพื่อให้ผู้ใช้สามารถแก้ไข สถานะของรายการนั้นได้ ทันที โดยไม่ต้องไปอัพเดทในหน้าแก้ไขข้อมูล
จะทำให้ทำงานได้สะดวกขึ้น ยกตัวอย่าง เราจะเพิ่มสถานะของรายการเข้าไป เป็น "ใช้งาน" กับ "ปิดใช้งาน" โดย
ให้ค่าเป็น 1 และ 0 ตามลำดับ ลงไปในข้อมูลทดสอบ (สามารถดูตัวอย่าง ที่ DEMO 2 ท้ายบทความ)
demo.php
<!doctype html>
<html>
<head>
    <meta charset="utf-8">
    <meta name="viewport" content="width=device-width, initial-scale=1, shrink-to-fit=no">
    <title>Document</title>
    <link rel="stylesheet" href="https://unpkg.com/[email protected]/dist/css/bootstrap.min.css" >
</head>
<body>

<?php
$arr_simple_data = array(
	array("id"=>1,"title"=>"รายการทดสอบ 1","status"=>0),
	array("id"=>2,"title"=>"รายการทดสอบ 2","status"=>0),
	array("id"=>3,"title"=>"รายการทดสอบ 3","status"=>1),
	array("id"=>4,"title"=>"รายการทดสอบ 4","status"=>0),
	array("id"=>5,"title"=>"รายการทดสอบ 5","status"=>0),
);
?>
<div class="container mb-2">
<div class="row bg-light py-3">
	<div class="col text-center">
    Content Test
    </div>
</div>
<div class="table-responsive-sm">
<table class="table table-sm table-hover">
  <thead>
    <tr>
      <th scope="col" class="text-center">#</th>
      <th scope="col">หัวข้อ</th>
      <th scope="col" class="text-center">สถานะ</th>
      <th scope="col" class="text-center">จัดการ</th>
    </tr>
  </thead>
  <tbody>
  <?php
  	foreach($arr_simple_data as $row){
  ?>
    <tr class="">
      <th scope="row" class="text-center" width="40"><?=$row['id']?></th>
      <td class="text-nowrap">
      	<?=$row['title']?>
      </td>
      <td class="text-nowrap text-center" width="50">
        <div class="btn-group-toggle btn-status-check" data-toggle="buttons">
          <label class="btn btn-sm <?=($row['status']==1)?"btn-success":"btn-light"?>">
            <input type="checkbox" <?=($row['status']==1)?"checked":""?> value="<?=$row['id']?>" > ใช้งาน
          </label>
        </div>
      </td>
      <td class="text-nowrap text-center" width="40">
			<a href="?d_item_id=<?=$row['id']?>" title="ลบรายการข้อมูล" class="btn btn-sm btn-danger btn-confirm">ลบ</a>
      </td>
    </tr>
<?php
	}
?>
  </tbody>
</table>
</div>

</div>


<script src="https://unpkg.com/[email protected]/dist/jquery.min.js"></script>
<script src="https://unpkg.com/[email protected]/dist/js/bootstrap.min.js"></script>
<script type="text/javascript">
$(function(){

 	$(".btn-status-check").on("click",function(){
		var obj = $(this);
		var checkStatus = obj.find(":checkbox").prop("checked");
		var dataID = obj.find(":checkbox").val();
		var checkVal = (checkStatus)?0:1; // สลับจากค่าเดิม ถ้าเดิมถูกเลือก แสดง่ว่าเป็น 1 ต้องสลับเป็น 0
		setTimeout(function(){ // หน่วงเวลานิดหน่อย เพื่อให้บางค่าอัพเดทถูกต้อง
			if(checkStatus){ // ถ้าเดิมมีการเลือกไว้อยู่แล้ว หรือในที่นี้มีสถานะเป็น 1
			// สถานะจะสลับเป็น 0 หรือถุกติ้กออก
				obj.find("label").addClass("btn-light").removeClass("btn-success active");
				obj.find("label :checkbox").prop("checked",false);
			}else{  // ถ้าเดิมยังไม่ถูกเลือก
				// สถานะจะสลับเป็น 1 หรือถุกติ้กเลือก
				obj.find("label").addClass("btn-success").removeClass("btn-light active");
				obj.find("label :checkbox").prop("checked",true);
			}
			console.log(dataID); // ค่า id ของรายการที่เราจะอัพเดท
			console.log(checkVal);	// ค่าการกำหนดสถานะใหม่ 1 หรือ 0
			// นำค่า id และ ค่าสถานะ 1 และ 0 ไปอัพเดทผ่าน ajax
		},5); // หน่างเวลา 5 มิลลิวินาที

	});

	 $(".btn-confirm").on("click",function(){
	 	var obj = $(this); // อ้างอิงปุ่ม
	 	obj.parents("tr").toggleClass("table-danger"); // เปลี่ยนสีพื้นหลังแถวที่จะลบ
		// ถ้ามีการกำหนด title ใช้ข้อความใน title มาข้นแจ้ง ถ้าไม่มีใช้ค่าที่กำหนด "ลบรายการข้อมูล"
		 var alertMsg = (obj.attr("title")!=undefined)?obj.attr("title"):"ลบรายการข้อมูล";
		 setTimeout(function(){ // หน่วงเวลาเพื่อให้ การกำหนดสีพืนหลังแถวทำงานได้
			 if(!confirm("ยืนยันการทำรายการ "+alertMsg+" ?")){
				 	obj.parents("tr").toggleClass("table-danger"); // ไม่ยืนยันการลบ เปลี่ยนสีพื้นหลังกลับ
			 }else{
					window.location = obj.attr("href"); // ถ้ายืนยันการลบ ก็ให้ลิ้งค์ทำงาน
			 }
		 },100); // หน่วงเวลา 100 มิลลิวินาที
		 return false; // ไม่ให้ลิ้งค์ทำงานปกติ ให้เข้าไปในเงื่อนไข confirm แทน
	 });

});
</script>
</body>
</html>
ตัวอย่างส่วนของโค้ดสำหรับนำค่าไปอัพเดทสถานะในฐานข้อมูล ตัดมาเฉพาะส่วนของ javascript
$(".btn-status-check").on("click",function(){
	var obj = $(this);
	var checkStatus = obj.find(":checkbox").prop("checked");
	var dataID = obj.find(":checkbox").val();
	var checkVal = (checkStatus)?0:1; // สลับจากค่าเดิม ถ้าเดิมถูกเลือก แสดง่ว่าเป็น 1 ต้องสลับเป็น 0
	setTimeout(function(){
		if(checkStatus){ // ถ้าเดิมมีการเลือกไว้อยู่แล้ว หรือในที่นี้มีสถานะเป็น 1
		// สถานะจะสลับเป็น 0 หรือถุกติ้กออก
			obj.find("label").addClass("btn-light").removeClass("btn-success active");
			obj.find("label :checkbox").prop("checked",false);
		}else{  // ถ้าเดิมยังไม่ถูกเลือก
			// สถานะจะสลับเป็น 1 หรือถุกติ้กเลือก
			obj.find("label").addClass("btn-success").removeClass("btn-light active");
			obj.find("label :checkbox").prop("checked",true);
		}
		console.log(dataID); // ค่า id ของรายการที่เราจะอัพเดท
		console.log(checkVal);	// ค่าการกำหนดสถานะใหม่ 1 หรือ 0
		// ตัวอย่างสมมติเราส่งแบบ ajax ไปที่ไฟล์ ajax_status_json.php
		$.post("ajax_status_json.php",{
			data_id:dataID,
			check_val:checkVal
		},function(res){
			if(res && res!=null){
				if(res.status_code==1){
					console.log("อัพเดทข้อมูลเรียบร้อยแล้ว");
				}
			}
		});
	},5);

});
ไฟล์ dbconnect.php
<?php
$mysqli = new mysqli("localhost", "root","","test");
/* check connection */
if ($mysqli->connect_errno) {
    printf("Connect failed: %s\n", $mysqli->connect_error);
    exit();
}
if(!$mysqli->set_charset("utf8")) {
    printf("Error loading character set utf8: %s\n", $mysqli->error);
    exit();
}
ตัวอย่างไฟล์ ajax_staus_json.php
<?php
session_start();
header("Content-type:application/json; charset=UTF-8");
header("Cache-Control: no-store, no-cache, must-revalidate");
header("Cache-Control: post-check=0, pre-check=0", false);
require_once("dbconnect.php");

$json_data = array();

if(isset($_POST['data_id']) && $_POST['data_id']!=""
	&& !is_null($_POST['check_val'])
	){
	$data_id =  (int) $_POST['data_id'];
	$data_checkval  = (int) $_POST['check_val'];
	$sql = "
	UPDATE simple_table  SET
	item_active='".$data_checkval."'
	WHERE item_id='".$data_id."'
	";
	if($mysqli->query($sql)){
		$json_data = array(
			"status_code"=>1,
			"status_message"=>"successful"
		);
	}else{
		$json_data = array(
			"status_code"=>0,
			"status_message"=>"fail"
		);
	}
}else{
	$json_data = array(
		"status_code"=>0,
		"status_message"=>"fail"
	);
}

// แปลง array เป็นรูปแบบ json string
if(isset($json_data)){
    $json= json_encode($json_data);
    if(isset($_POST['callback']) && $_POST['callback']!=""){
    echo $_POST['callback']."(".$json.");";
    }else{
    echo $json;
    }
}
?>
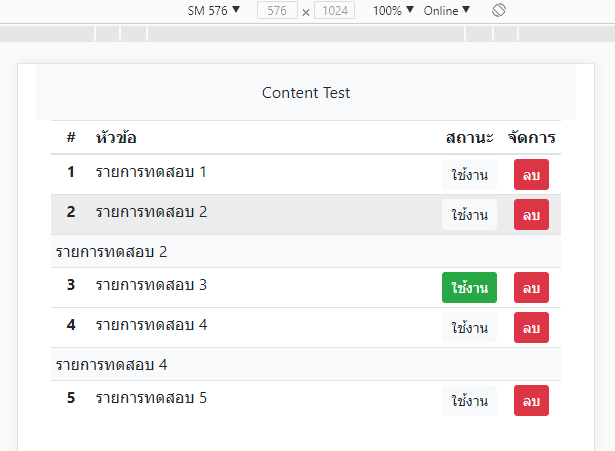
การซ่อนแสดงข้อมูลเพิ่มเติมในตาราง
ก่อนจบเนื้อหา ขอเพิ่มเติมเทคนิคเล็กน้อย สำหรับการแสดงข้อมูลเพิ่มเติมในตาราง ที่บางครั้งเราจำเป็นต้อง
แสดงข้อมูลบางอย่างในตาราง แต่เราไม่ต้องการที่จะแสดงข้อมูลนั้นๆ ทันที แต่จะซ่อนไว้ก่อน หากต้องการแสดง
ข้อมูลของรายการใด ให้ผู้ใช้คลิกเลือกที่รายการนั้น รายการข้อมูลเพิ่มเติมก็จะแสดง หากคลิกอีกทีข้อมูลก็จะถูกซ่อน
ไป วิธีการนี้ เราใช้เทคนิค jquery อย่างง่ายคือ เรียกใช้ css class "d-none" สำหรับ ซ่อนรายการ และ "d-table-row"
สำหรับแสดงแถวรายการ (สามารถดูตัวอย่าง ที่ DEMO 3 ท้ายบทความ)
demo.php
<!doctype html>
<html>
<head>
    <meta charset="utf-8">
    <meta name="viewport" content="width=device-width, initial-scale=1, shrink-to-fit=no">
    <title>Document</title>
    <link rel="stylesheet" href="https://unpkg.com/[email protected]/dist/css/bootstrap.min.css" >
</head>
<body>

<?php
$arr_simple_data = array(
	array("id"=>1,"title"=>"รายการทดสอบ 1","status"=>0),
	array("id"=>2,"title"=>"รายการทดสอบ 2","status"=>0),
	array("id"=>3,"title"=>"รายการทดสอบ 3","status"=>1),
	array("id"=>4,"title"=>"รายการทดสอบ 4","status"=>0),
	array("id"=>5,"title"=>"รายการทดสอบ 5","status"=>0),
);
?>
<div class="container mb-2">
<div class="row bg-light py-3">
	<div class="col text-center">
    Content Test
    </div>
</div>
<div class="table-responsive-sm">
<table class="table table-sm table-hover">
  <thead>
    <tr>
      <th scope="col" class="text-center">#</th>
      <th scope="col">หัวข้อ</th>
      <th scope="col" class="text-center">สถานะ</th>
      <th scope="col" class="text-center">จัดการ</th>
    </tr>
  </thead>
  <tbody>
  <?php
  	foreach($arr_simple_data as $row){
  ?>
    <tr class="">
      <th scope="row" class="text-center" width="40"><?=$row['id']?></th>
      <td class="text-nowrap" onClick="$('#item-<?=$row['id']?>').toggleClass('d-none d-table-row')">
      	<?=$row['title']?>
      </td>
      <td class="text-nowrap text-center" width="50">
        <div class="btn-group-toggle btn-status-check" data-toggle="buttons">
          <label class="btn btn-sm <?=($row['status']==1)?"btn-success":"btn-light"?>">
            <input type="checkbox" <?=($row['status']==1)?"checked":""?> value="<?=$row['id']?>" > ใช้งาน
          </label>
        </div>
      </td>
      <td class="text-nowrap text-center" width="40">
			<a href="?d_item_id=<?=$row['id']?>" title="ลบรายการข้อมูล" class="btn btn-sm btn-danger btn-confirm">ลบ</a>
      </td>
    </tr>
    <tr class="d-none" id="item-<?=$row['id']?>">
    	<td colspan="4" class="bg-light">
        <?=$row['title']?>
        </td>
    </tr>
<?php
	}
?>
  </tbody>
</table>
</div>

</div>


<script src="https://unpkg.com/[email protected]/dist/jquery.min.js"></script>
<script src="https://unpkg.com/[email protected]/dist/js/bootstrap.min.js"></script>
<script type="text/javascript">
$(function(){

 	$(".btn-status-check").on("click",function(){
		var obj = $(this);
		var checkStatus = obj.find(":checkbox").prop("checked");
		var dataID = obj.find(":checkbox").val();
		var checkVal = (checkStatus)?0:1; // สลับจากค่าเดิม ถ้าเดิมถูกเลือก แสดง่ว่าเป็น 1 ต้องสลับเป็น 0
		setTimeout(function(){
			if(checkStatus){ // ถ้าเดิมมีการเลือกไว้อยู่แล้ว หรือในที่นี้มีสถานะเป็น 1
			// สถานะจะสลับเป็น 0 หรือถุกติ้กออก
				obj.find("label").addClass("btn-light").removeClass("btn-success active");
				obj.find("label :checkbox").prop("checked",false);
			}else{  // ถ้าเดิมยังไม่ถูกเลือก
				// สถานะจะสลับเป็น 1 หรือถุกติ้กเลือก
				obj.find("label").addClass("btn-success").removeClass("btn-light active");
				obj.find("label :checkbox").prop("checked",true);
			}
			console.log(dataID); // ค่า id ของรายการที่เราจะอัพเดท
			console.log(checkVal);	// ค่าการกำหนดสถานะใหม่ 1 หรือ 0
		},5);

	});

	 $(".btn-confirm").on("click",function(){
	 	var obj = $(this); // อ้างอิงปุ่ม
	 	obj.parents("tr").toggleClass("table-danger"); // เปลี่ยนสีพื้นหลังแถวที่จะลบ
		// ถ้ามีการกำหนด title ใช้ข้อความใน title มาข้นแจ้ง ถ้าไม่มีใช้ค่าที่กำหนด "ลบรายการข้อมูล"
		 var alertMsg = (obj.attr("title")!=undefined)?obj.attr("title"):"ลบรายการข้อมูล";
		 setTimeout(function(){ // หน่วงเวลาเพื่อให้ การกำหนดสีพืนหลังแถวทำงานได้
			 if(!confirm("ยืนยันการทำรายการ "+alertMsg+" ?")){
				 	obj.parents("tr").toggleClass("table-danger"); // ไม่ยืนยันการลบ เปลี่ยนสีพื้นหลังกลับ
			 }else{
					window.location = obj.attr("href"); // ถ้ายืนยันการลบ ก็ให้ลิ้งค์ทำงาน
			 }
		 },100); // หน่วงเวลา 100 มิลลิวินาที
		 return false; // ไม่ให้ลิ้งค์ทำงานปกติ ให้เข้าไปในเงื่อนไข confirm แทน
	 });

});
</script>
</body>
</html>
หวังว่าเนื้อหาข้างต้นจะเป็นแนวทางสำหรับนำไปประยุกต์ใช้งานต่อไป

